

| |
 |  |  |  |  |  |
 |
| |||||||
| MazdaSpeed 3 - How-To's MazdaSpeed 3 - How-To's - Want help out fellow owners? Post How-To's to simplify future installations for others. |
|
Welcome to Mazdaspeed Forums . You are currently viewing our boards as a guest which gives you limited access to view most discussions and access our other features. By joining our free community you will have access to post topics, communicate privately with other members (PM), respond to polls, upload content and access many other special features. Registration is fast, simple and absolutely free so please, join our community today! If you have any problems with the registration process or your account login, please contact contact us. *When you join MSF as a registered user, there will be No Ads. *Registered Members get access to the Off Topic Area of the Forum *Registered Members have an opportunity to upgrade their accounts to VIP, which brings a host of goddies for supporting MSF such as Raffles, Additional Forum Access, More PM Storage, The ability to upload more Images and many other enhancements. *Registered members also get access to the live chat box! |
 |
| |  | LinkBack | Thread Tools | Search this Thread | Display Modes |
| |
 |  01-16-2012, 11:28 AM
| #1 |  |
  Join Date: Sep 2008 Location: Toronto, Ontario, Canada
Posts: 1,467
(View Stats)
iTrader: (1)
Rep Power: 2202   Thanks: 4,767
Thanked 4,088 Times in 1,066 Posts
Groans: 2
Groaned at 2 Times in 2 Posts
(Thread Starter) |   Neutral : +2 score Neutral : +2 score  How To: Assemble A Forged Motor How To: Assemble A Forged Motor I have been meaning to do this for a while but have procrastinated like no other. Its about time I got to it. For those who don't know. I built two forged motors that are identical in every way save for the oil cap; mine is the red aluminum MazdaSpeed unit and the second one is the plastic pos. The first engine is currently in my car and the second one is neatly packaged in the house looking for a new home. The pictures below were taken from both builds. If you see a mild change of scenery, you'll know why. Also, towards the end, the pictures get a little spotty (I'm missing a few) so I'll try to explain it as best as possible. Onto the walkthrough. Prepare your workstation and put the block onto the engine stand. Lay everything out neatly so you know where it goes. By the end of the assembly, your shit will be everywhere but at least you tried, right? 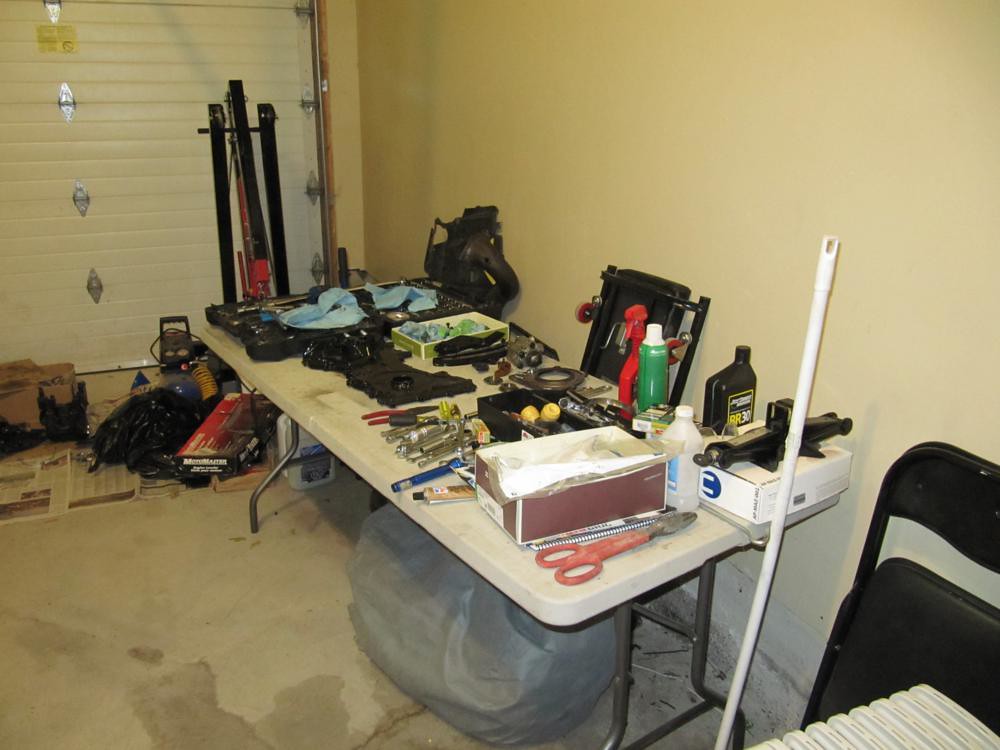 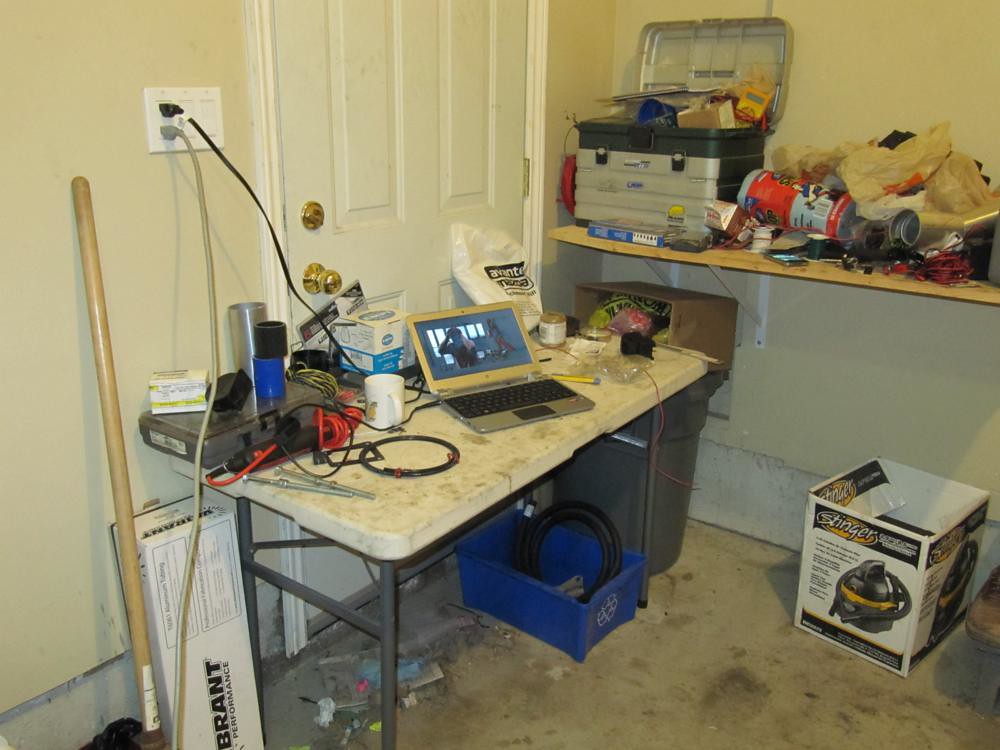  Grab the oil squirters and attach them to the block. With the Wiseco and Carillo setup, I had to slightly bend the squirter further to the center so the piston skirt wouldn't make contact. Don't bend them too much as you may weaken the metal. 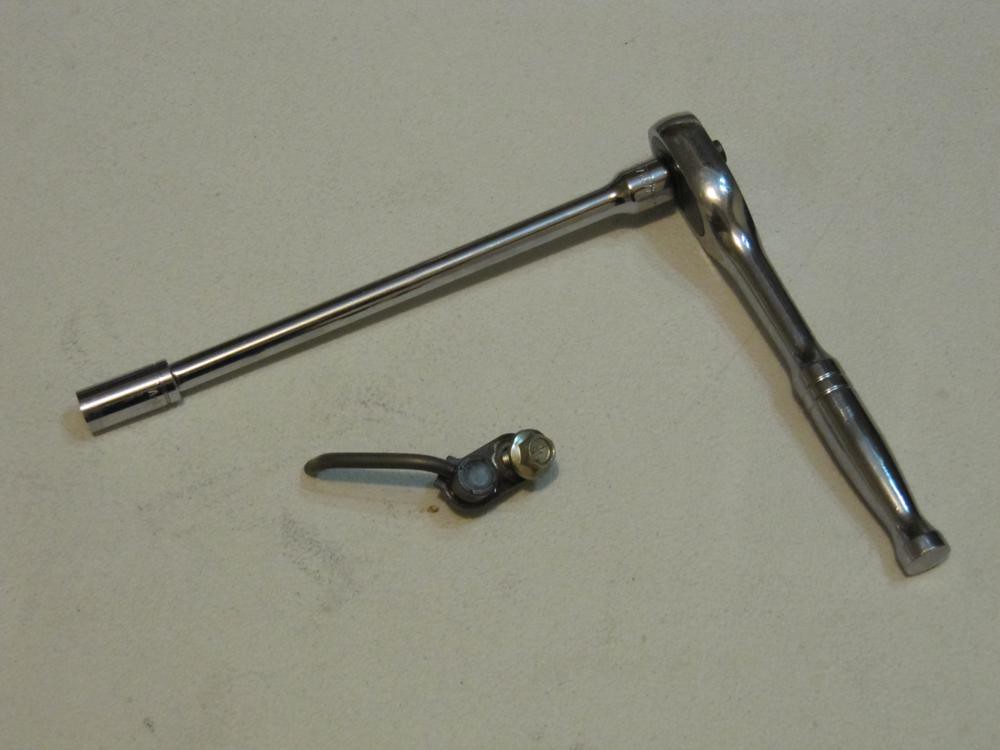 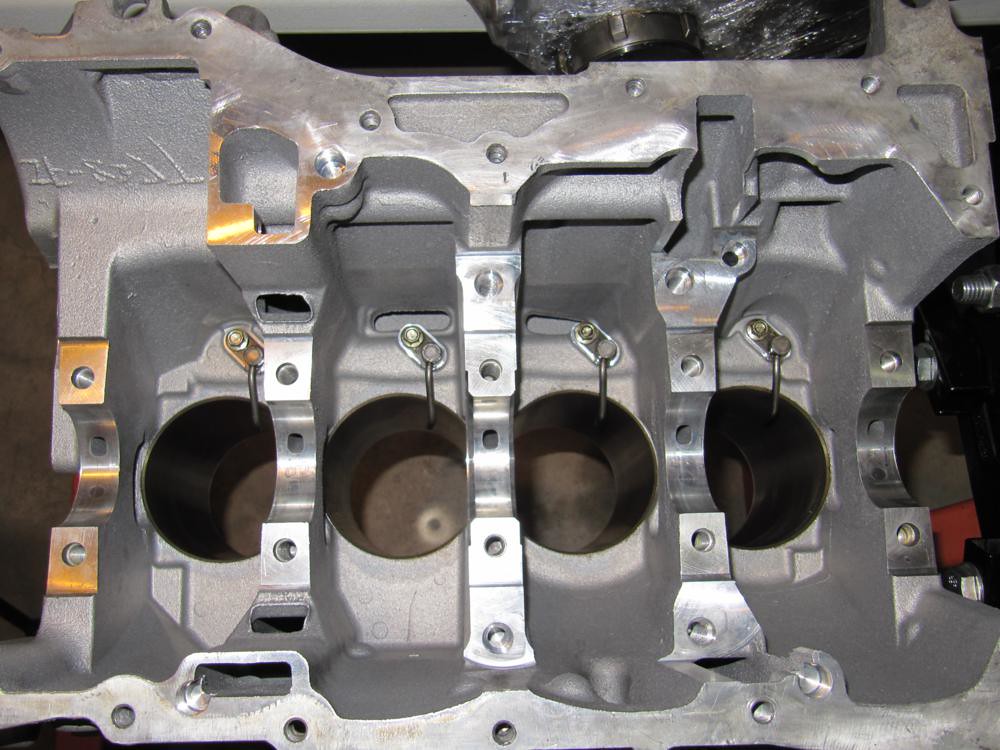 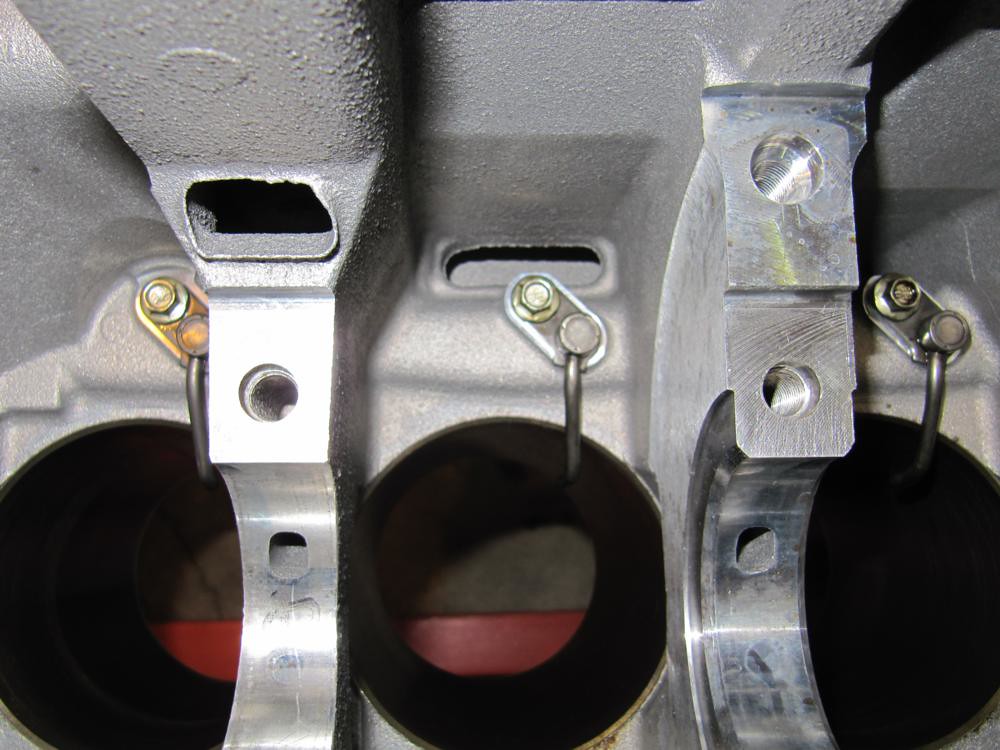 Prep balance shaft delete kit and install it. I put some threadlock onto the bolts for peace of mind. 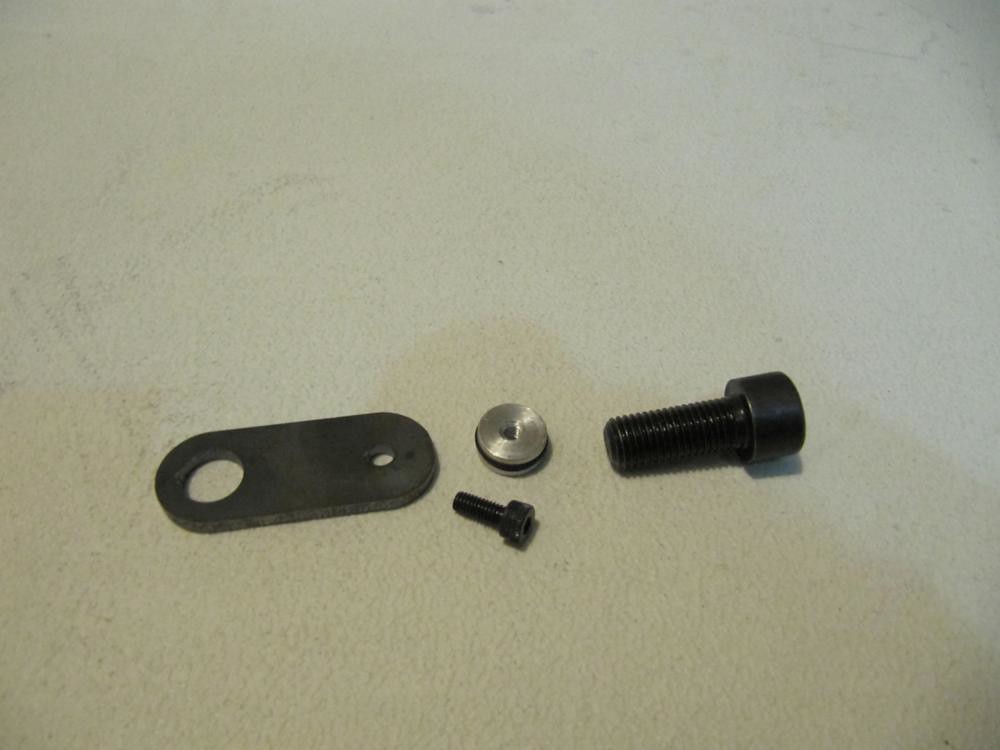 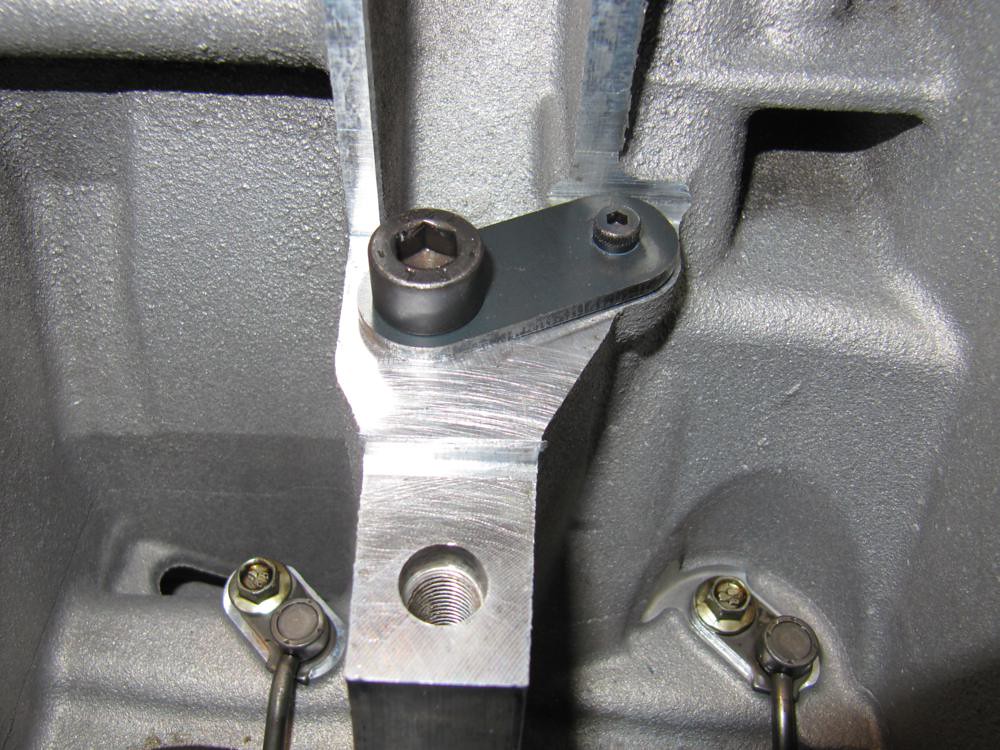 Grab some assembly lube and with your finger, spread it onto the bearing journal on the block. 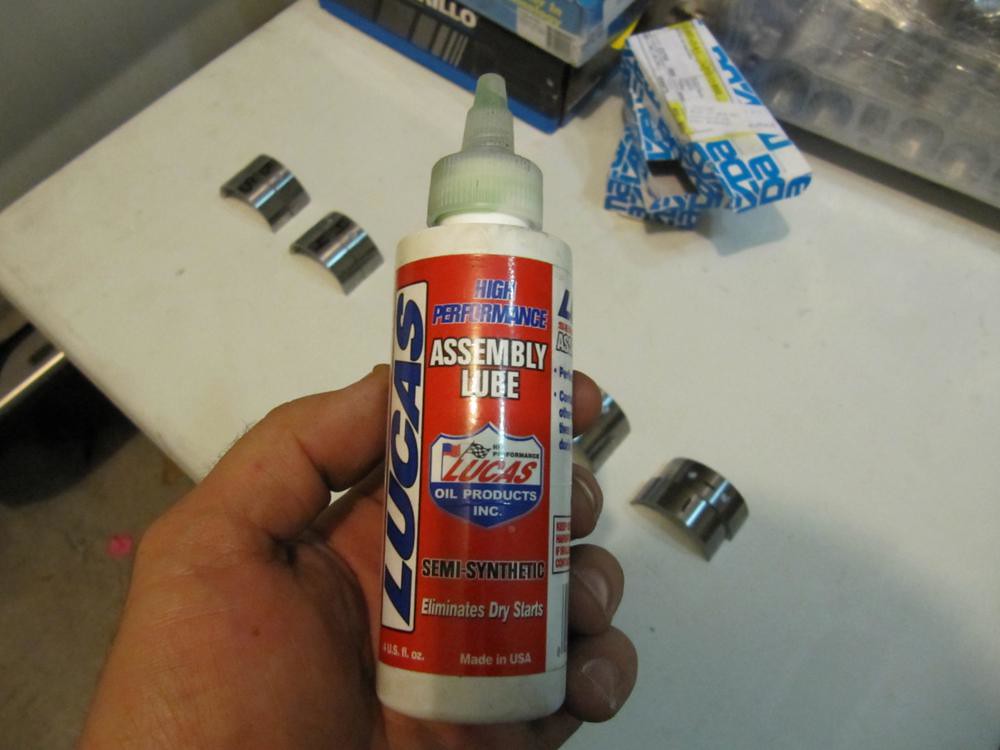 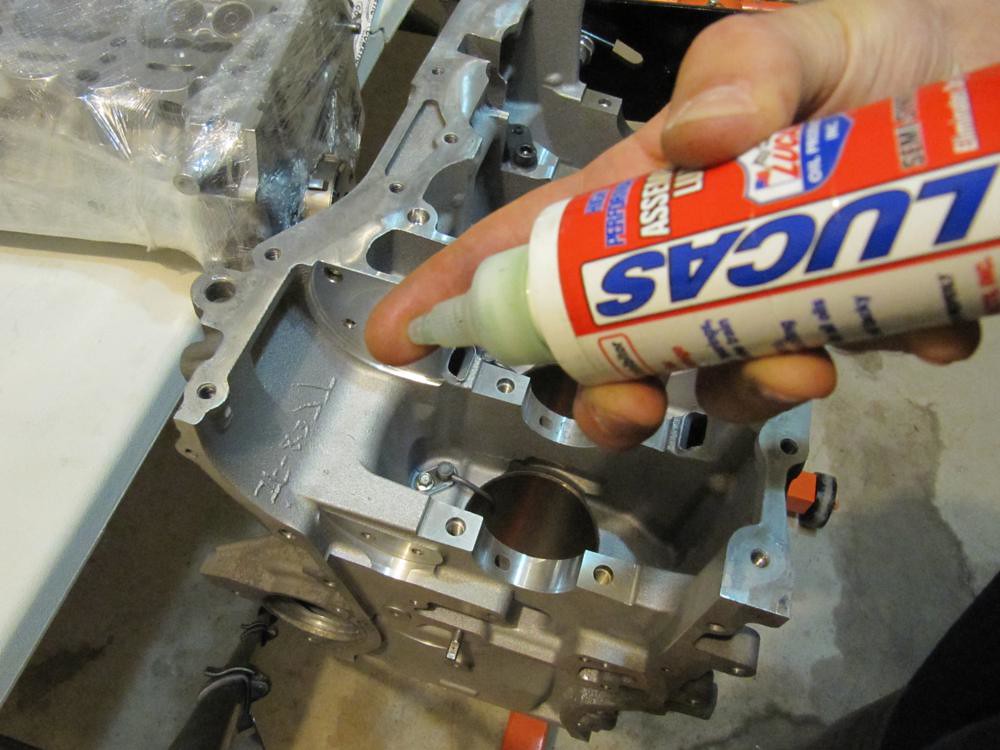 Lay out the main bearings in order. My engine builder (Competition Automotive) numbered them from 1 to 5. Bearing number 1 goes at the front of the engine (timing chain side). The bearings come in two pieces; ones with oil passages and ones without. The halves with oil passages are positioned on the block side and the halves without get positioned on the girdle side. Also notice that the half with the oil passages on bearing 3 is different. This is the thrust bearing and gets mounted on the block side (as mentioned earlier). 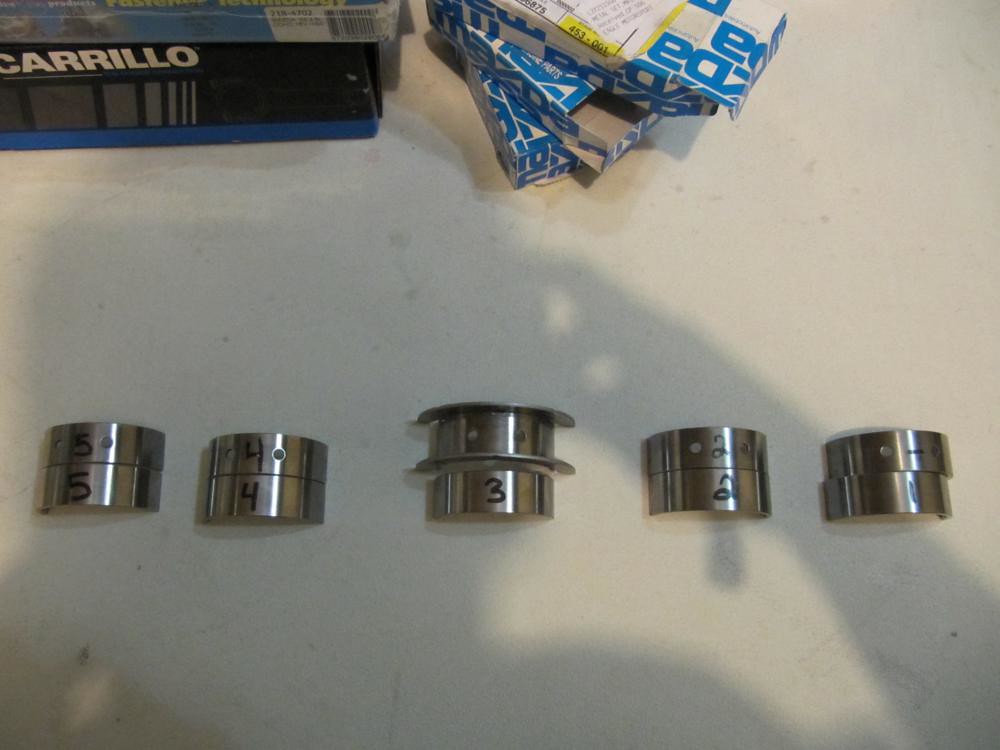 Grab the bearing halves with the oil passages, apply assembly lube on the inside of the bearing with your finger then position them on the block. Make sure they are properly centered in the journal. 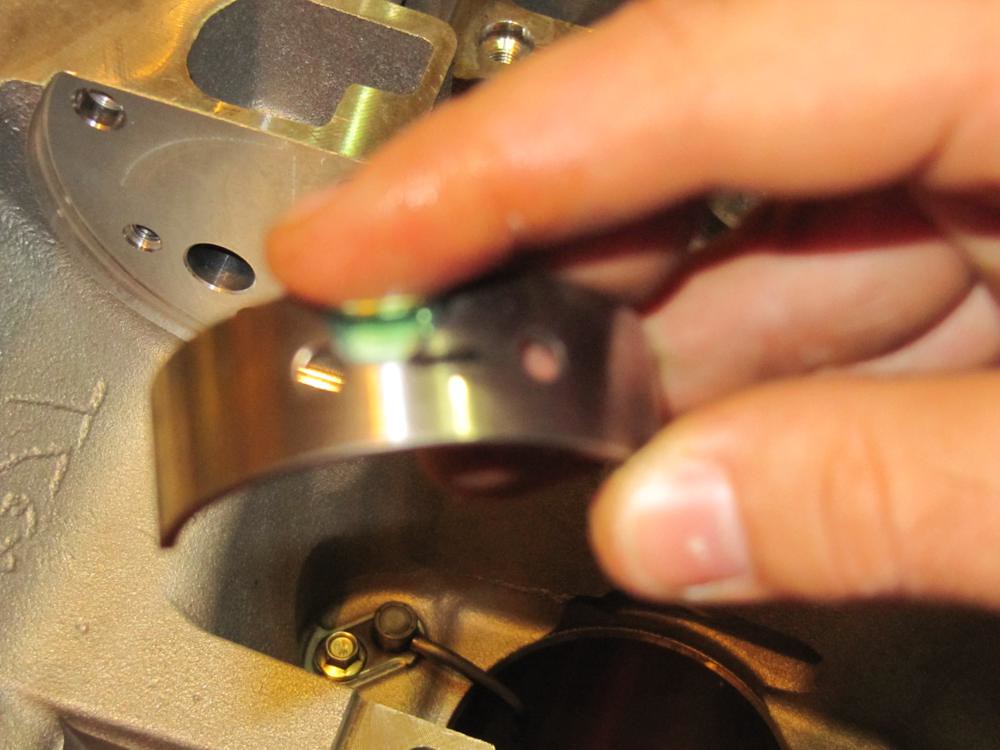 Next, grab the crank and drop it in (slowly!). 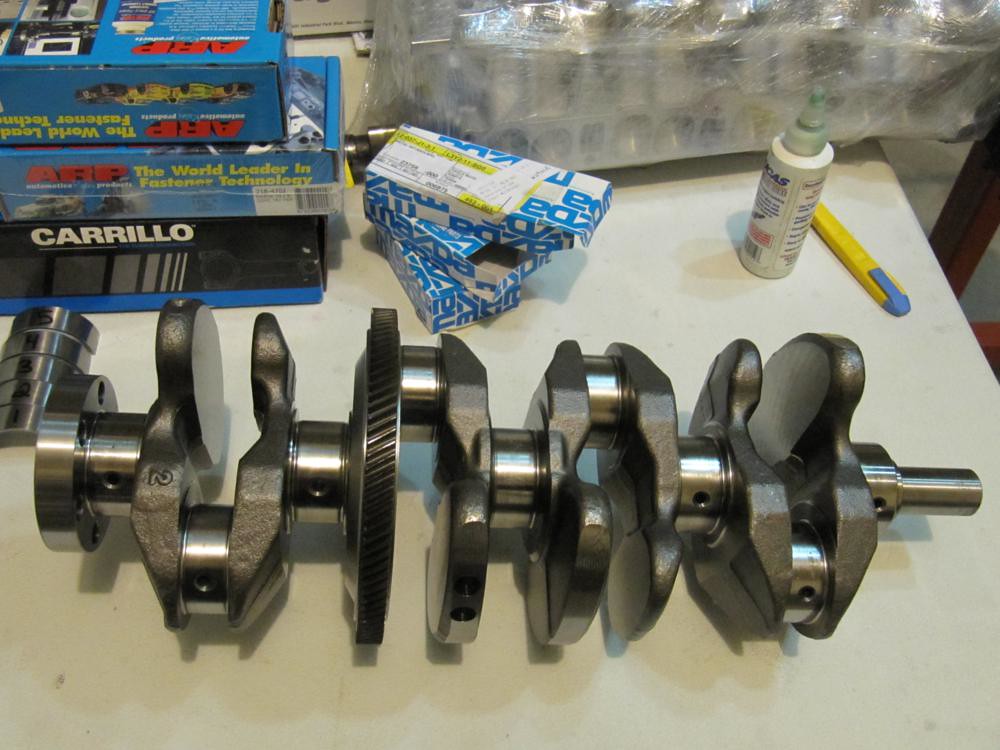 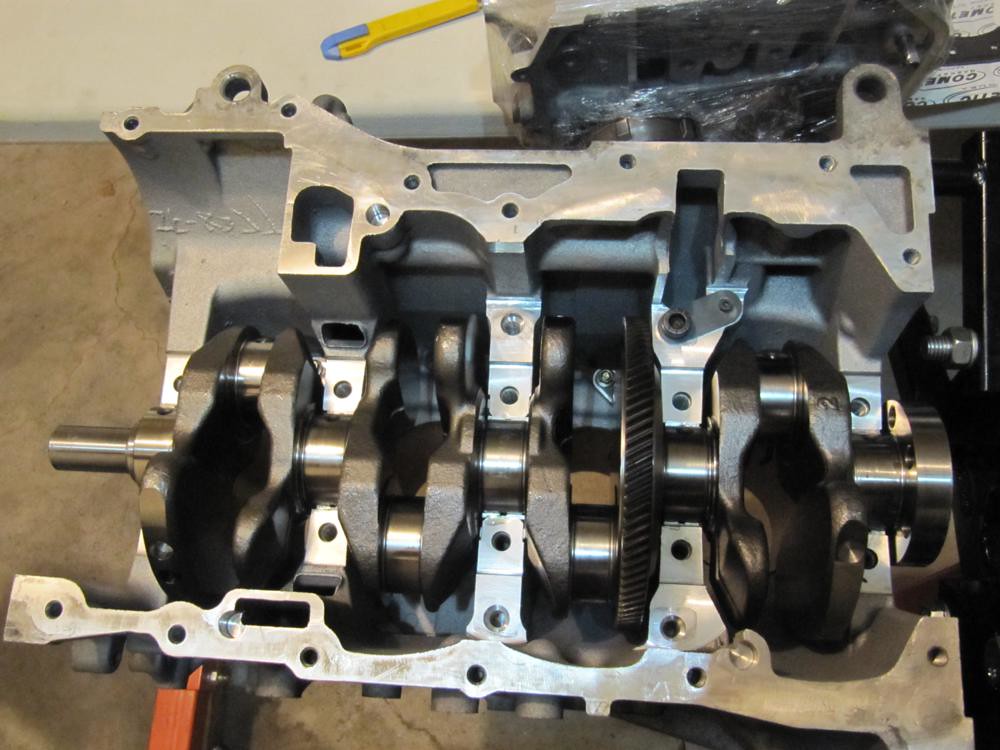 Apply assembly lube onto the main bearing portion of the crank in preparation for the other bearing halves.  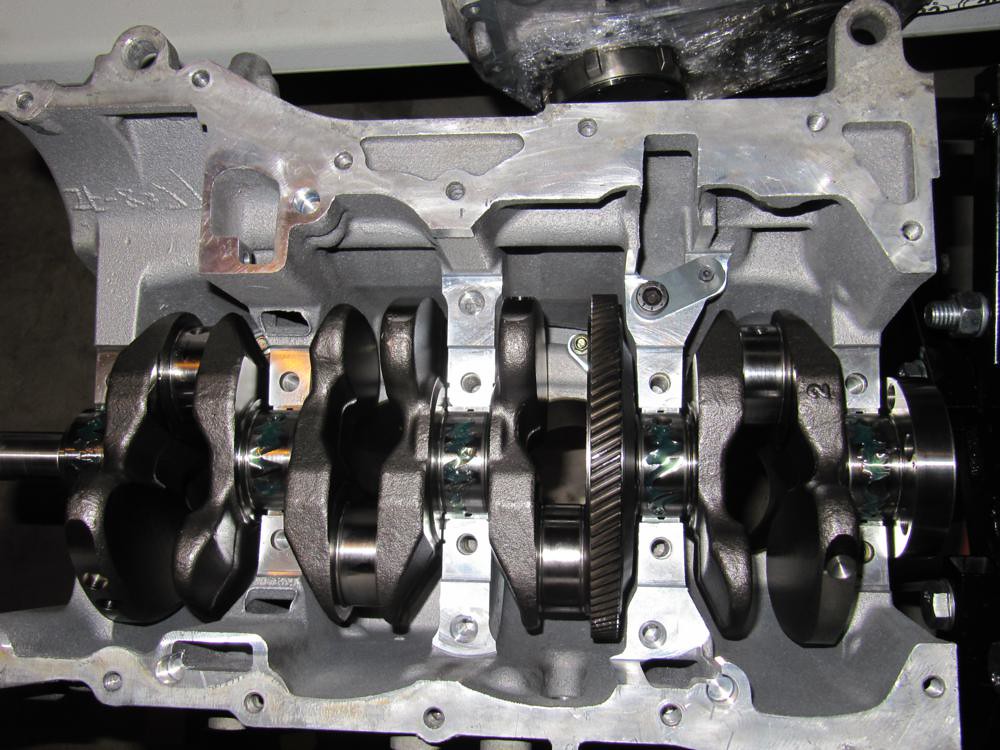 Position the bottom halves of the bearings onto the crank in numbered order. 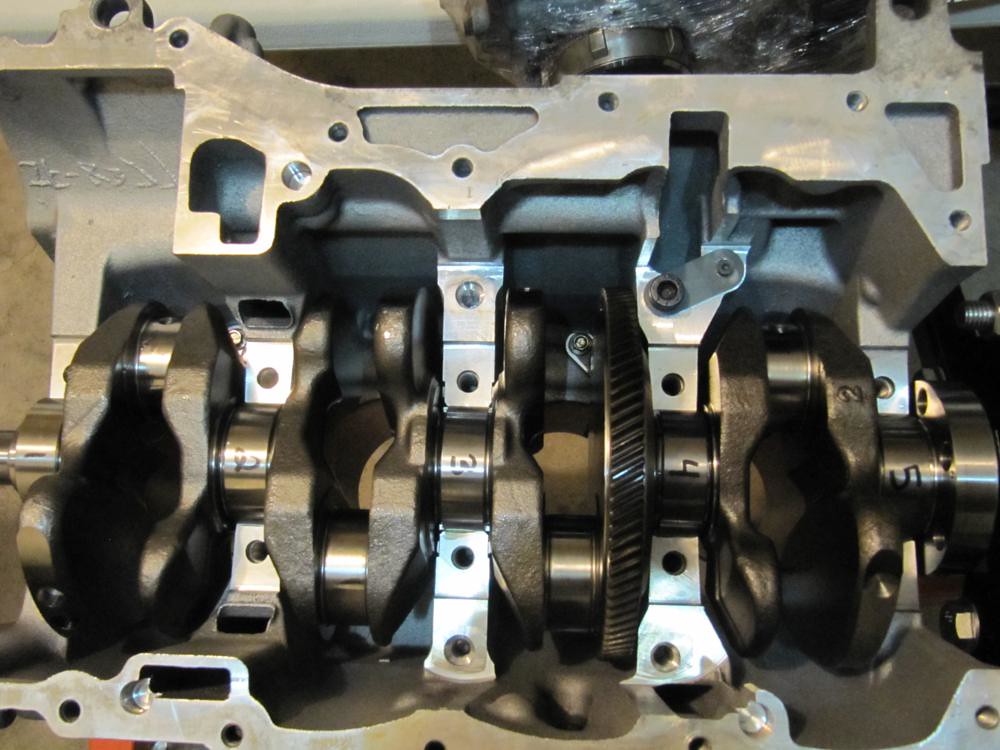 Grab your ARP MAIN studs and apply a generous amount of ARP Ultra-Torque lube onto the threaded portion without the hex shape on the end. Thread the studs into the block. 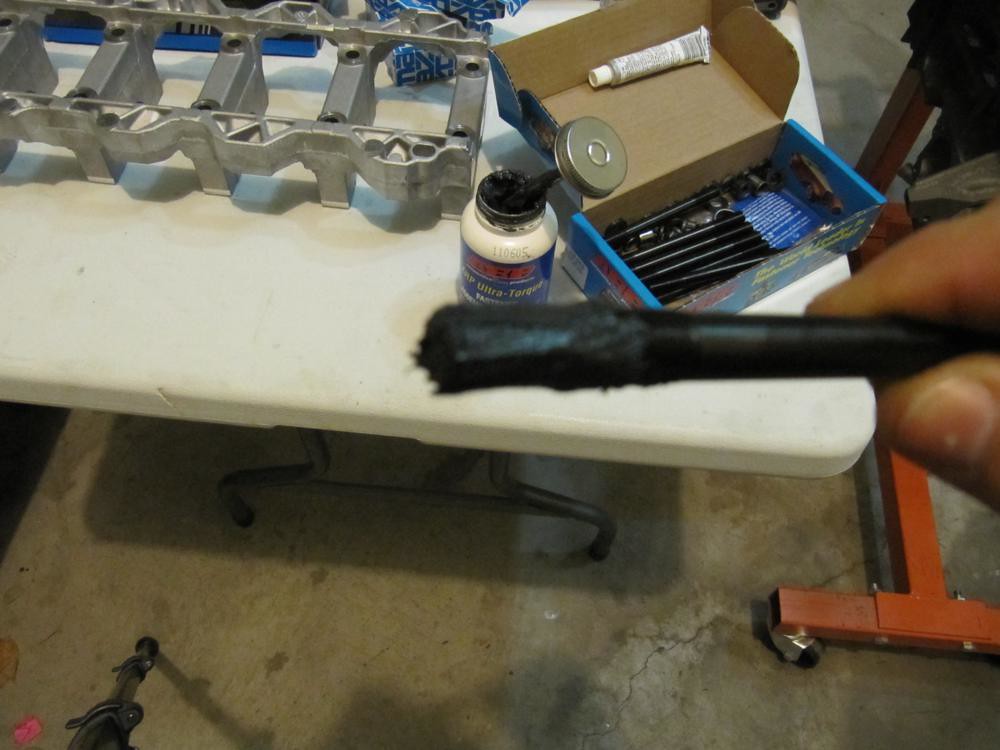  There are 10 main studs total. I found that it took a while to thread these things in without some assistance so I grabbed the proper hex head, put it on a screw driver handle and went to town. Be sure that you thread the studs all the way down until they stop. DO NOT ADD TORQUE TO THE STUDS ONCE THEY BOTTOM OUT AND DO NOT USE POWER TOOLS. If you do either, you should be slapped. 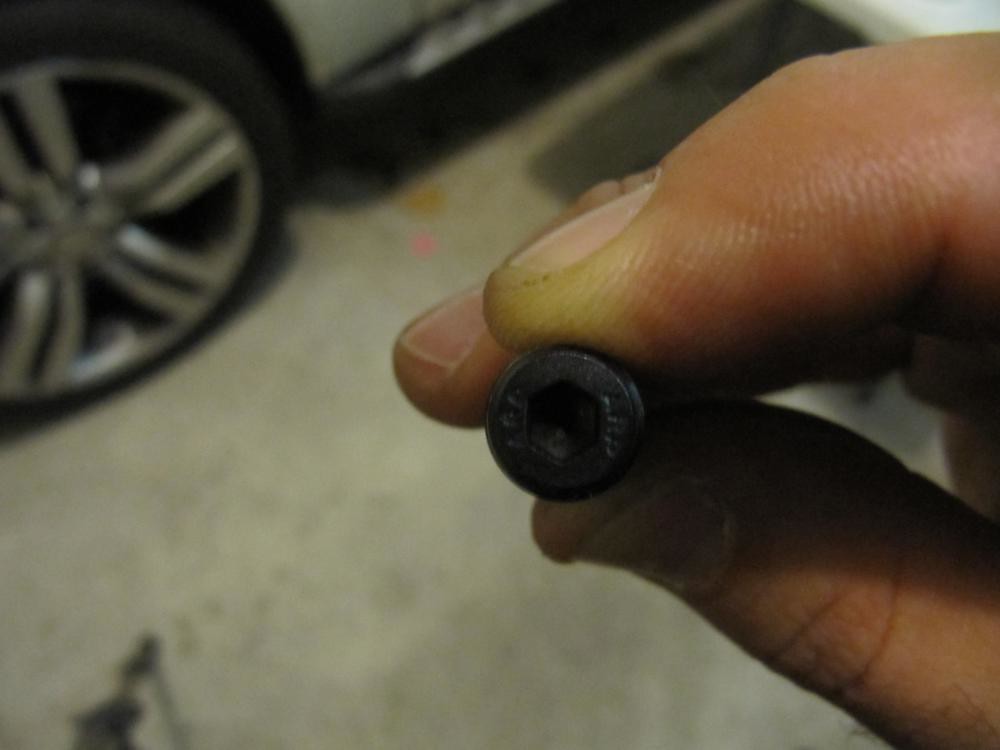 Apply assembly lube to the girdle journals. Don't be stingy but don't go nuts (this applies to using the lube on any necessary surface on the motor). 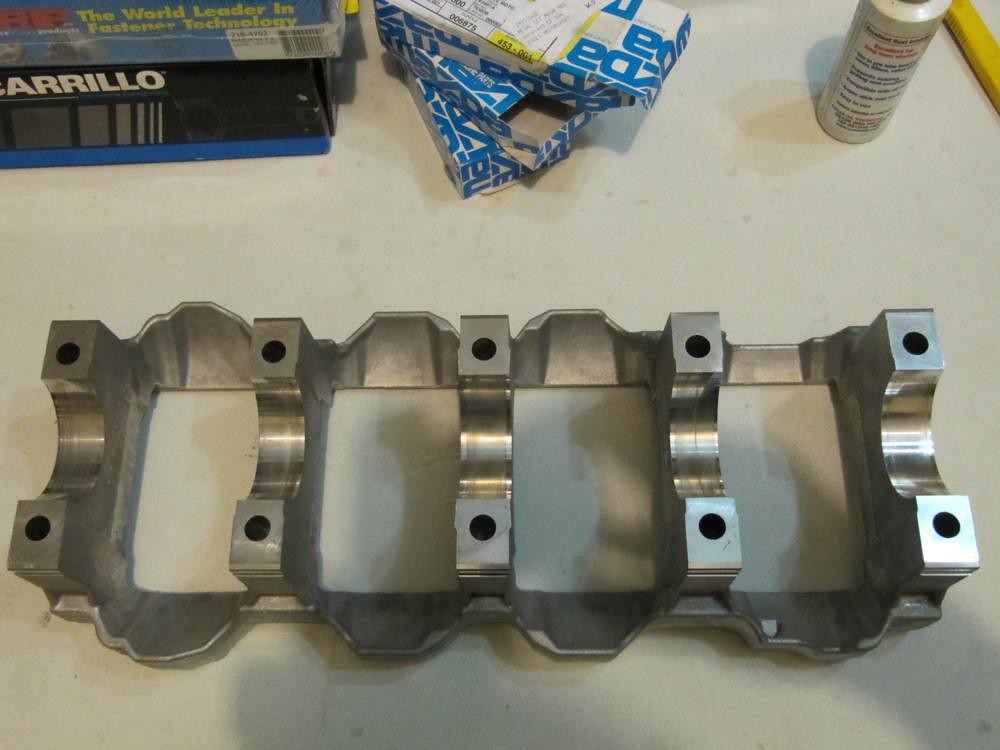 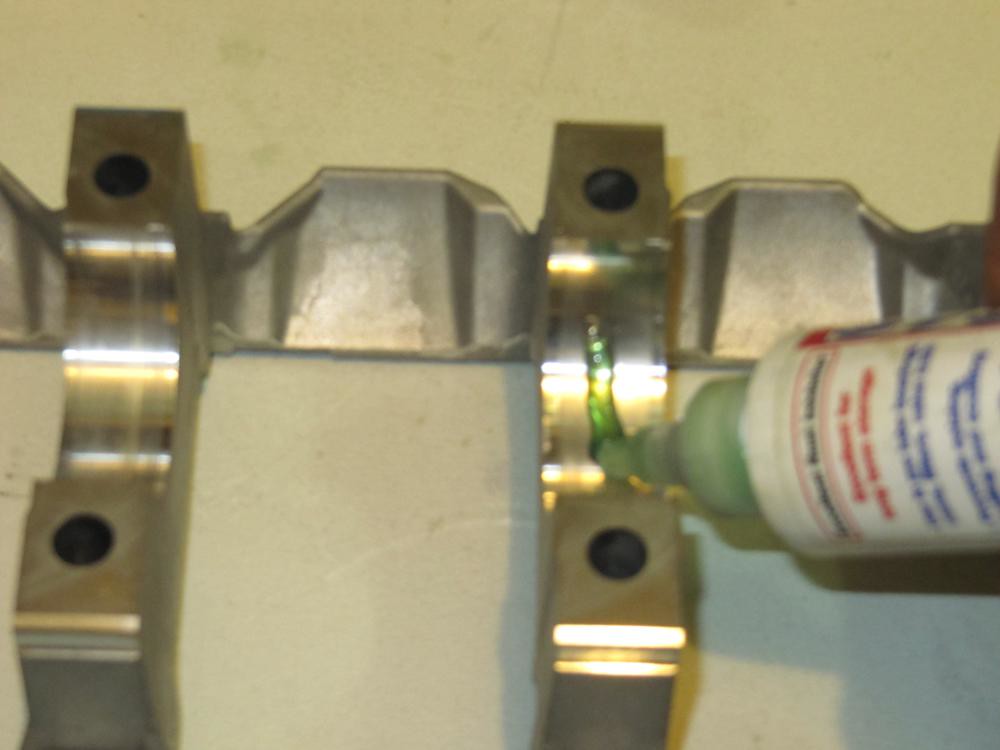 Gingerly align the girdle onto the studs and drop it in. The girdle only fits in one way without resistance. If you fail at putting together a puzzle, don't assemble a motor. 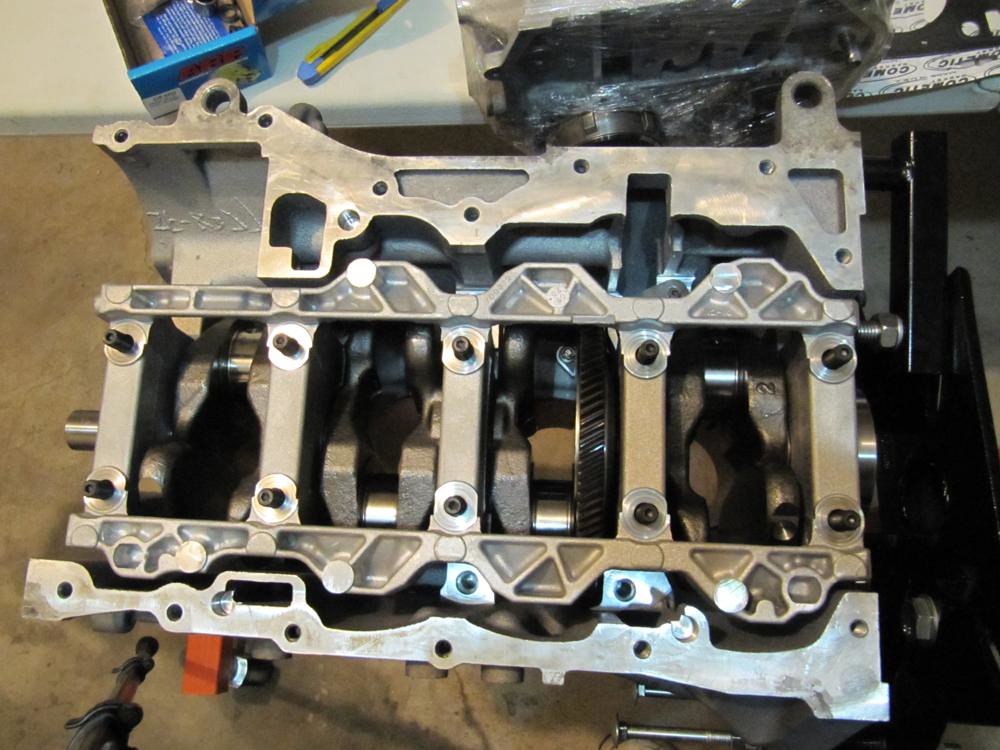 Grab the ARP Ultra-Torque lube and apply it liberally to the stud tops. Then, insert the washers and nuts accordingly. Hand tighten them down. 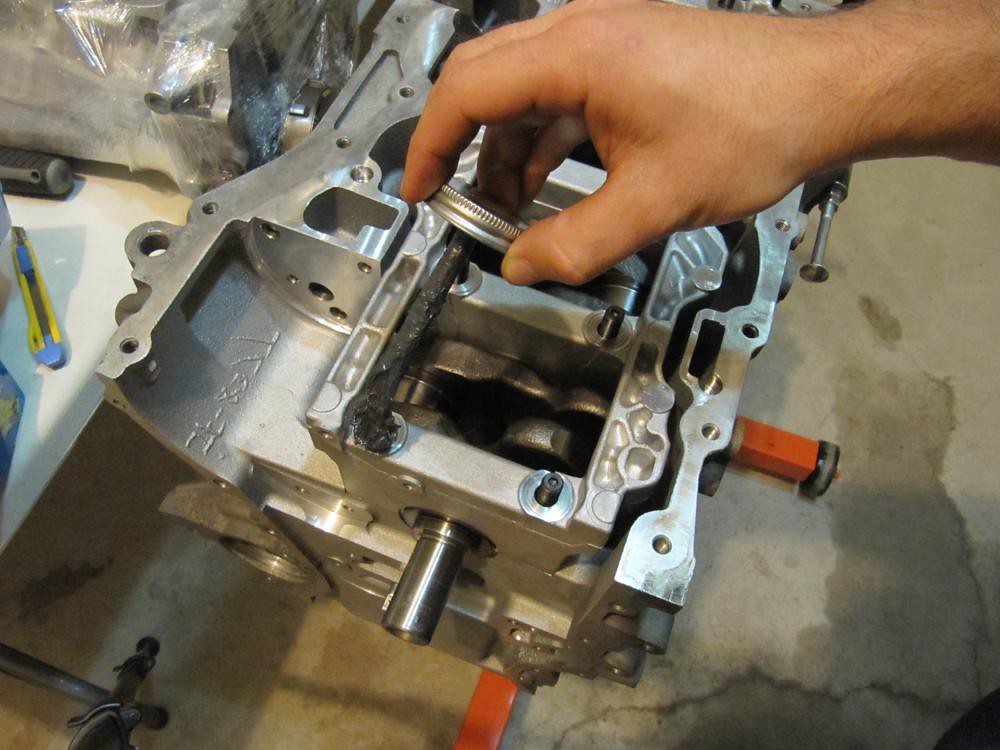  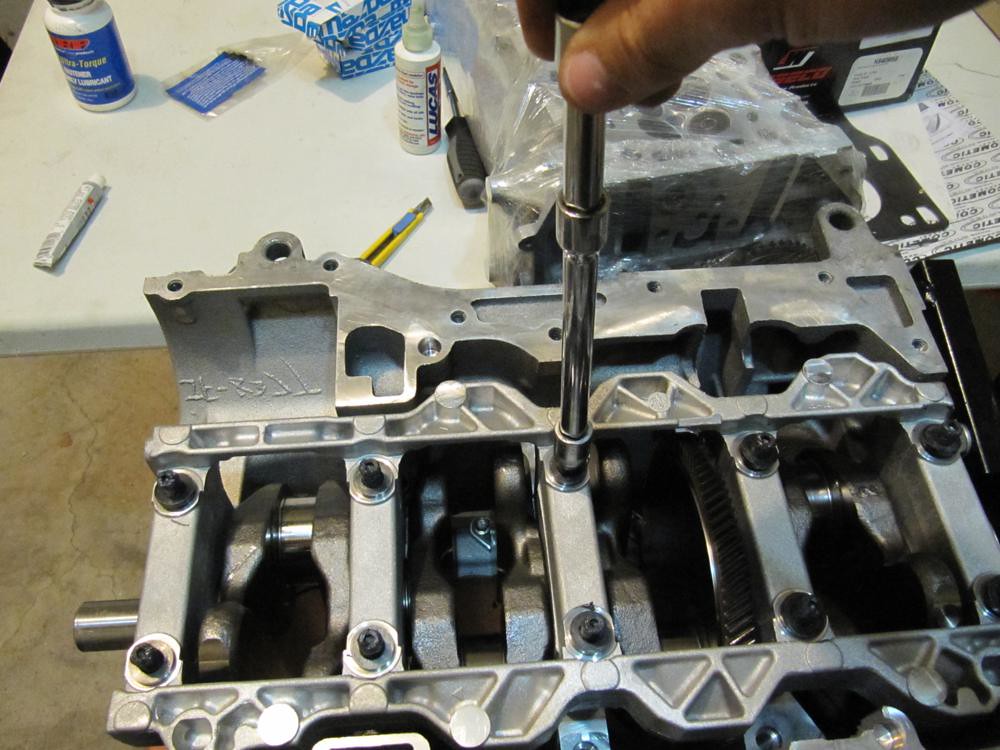 ARP recommends tightening the girdle down in 3 passes to a maximum of 60ft-lbs. Ensure you tighten them in the proper order (pictured below) in 20ft-lbs increments. 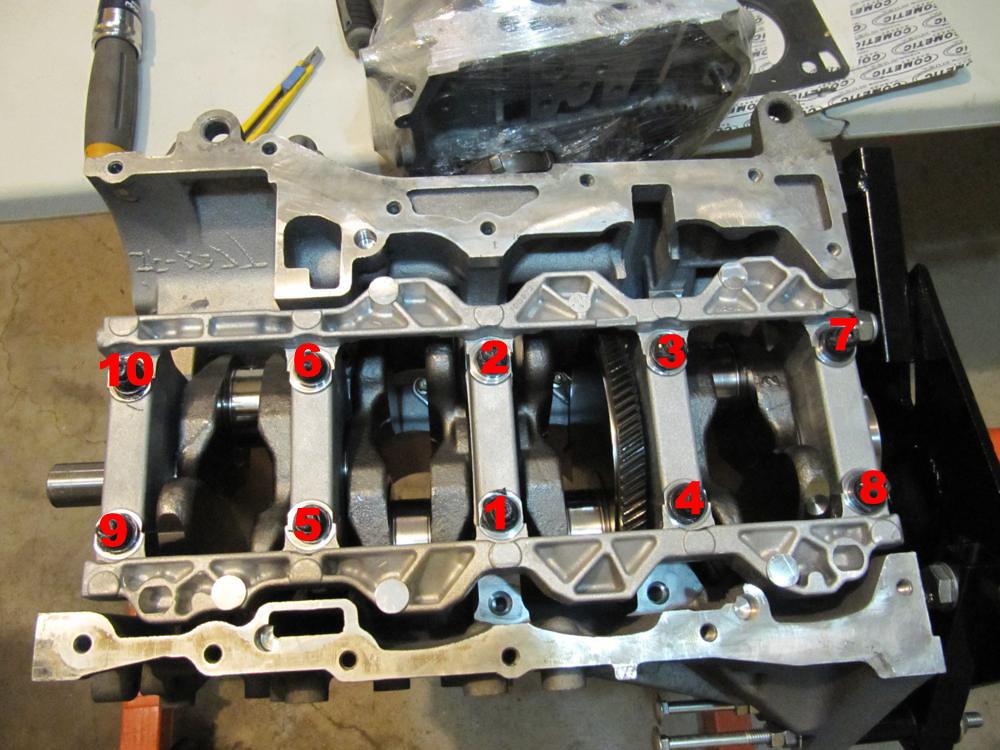  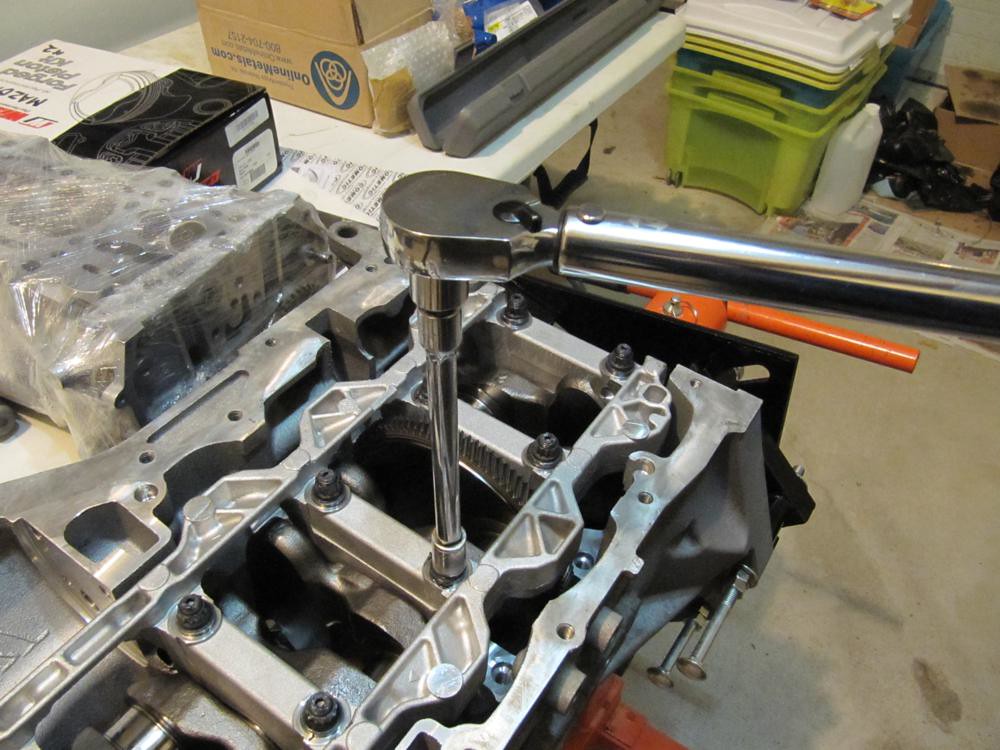 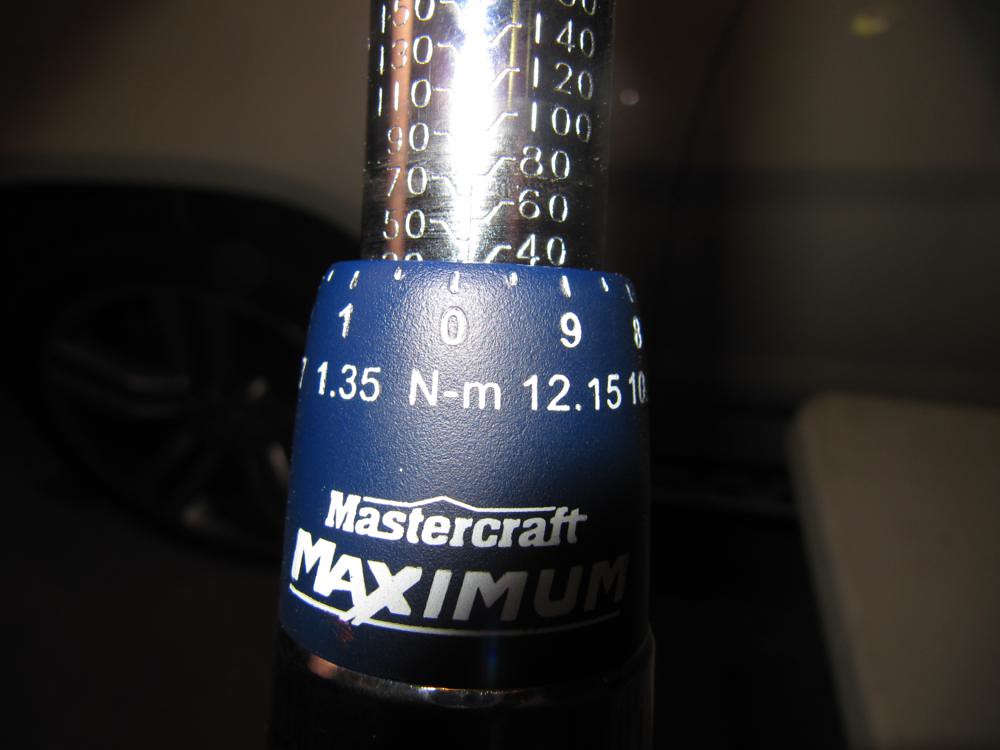 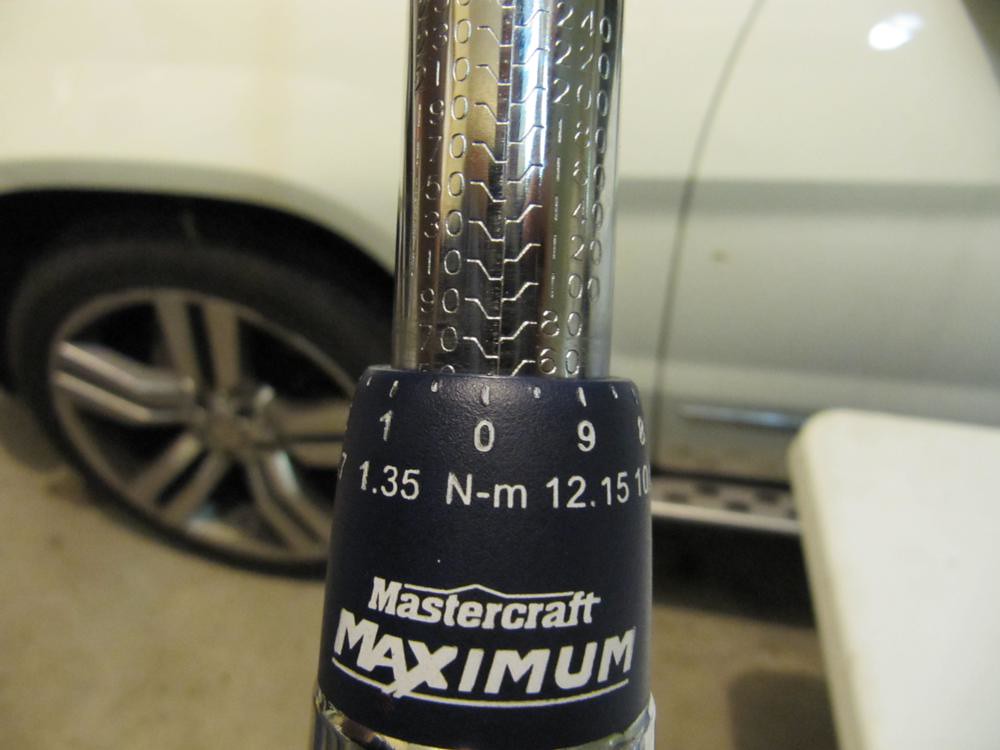 The crank is now securely fastened. Rotate the block upright for the next phase of the build. Also, grab your old crank pulley bolt and thread it into the crank; it'll become quite useful.   Lay your piston/rod (with rings) assemblies and corresponding rod bearings onto a flat surface. I had Competition Automotive assemble the piston to the rod for a small fee. On the second motor (pictured here), the also put the rings on. Unfortunately, I don't have pictures of the ring install from the first motor so I'm going to skip this step.  Grab piston/rod number 1, remove the rod cap, apply lube to the inner AND outer portion of the bearing halve for rod 1 and press it in. It'll require the tiniest bit of force for it to seat properly. Note the notch on the upper right-hand corner of the rod and the corresponding notch in the bearing; they only seat one way. 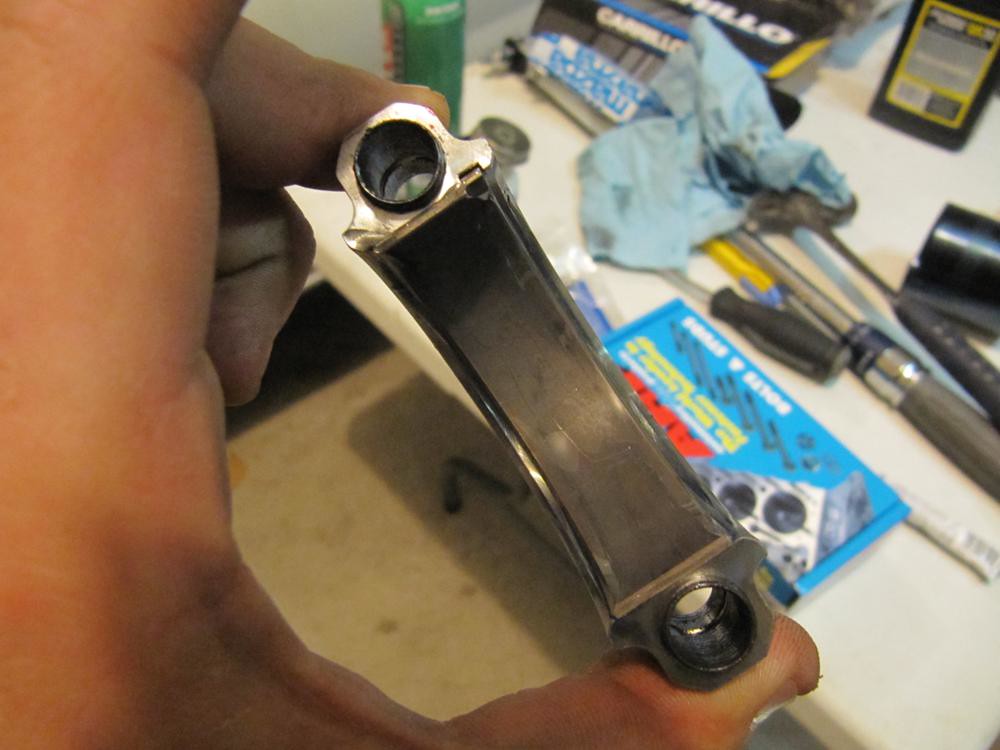 Apply some motor oil to the outside of the piston. Don't be stingy but don't go nuts; apply enough. Then, position the piston/rod combo into your ring compressor tool. Ensure the piston top is parallel to the top of the ring compressor and that the piston skirt hangs out juuuust a little; it'll help with alignment. 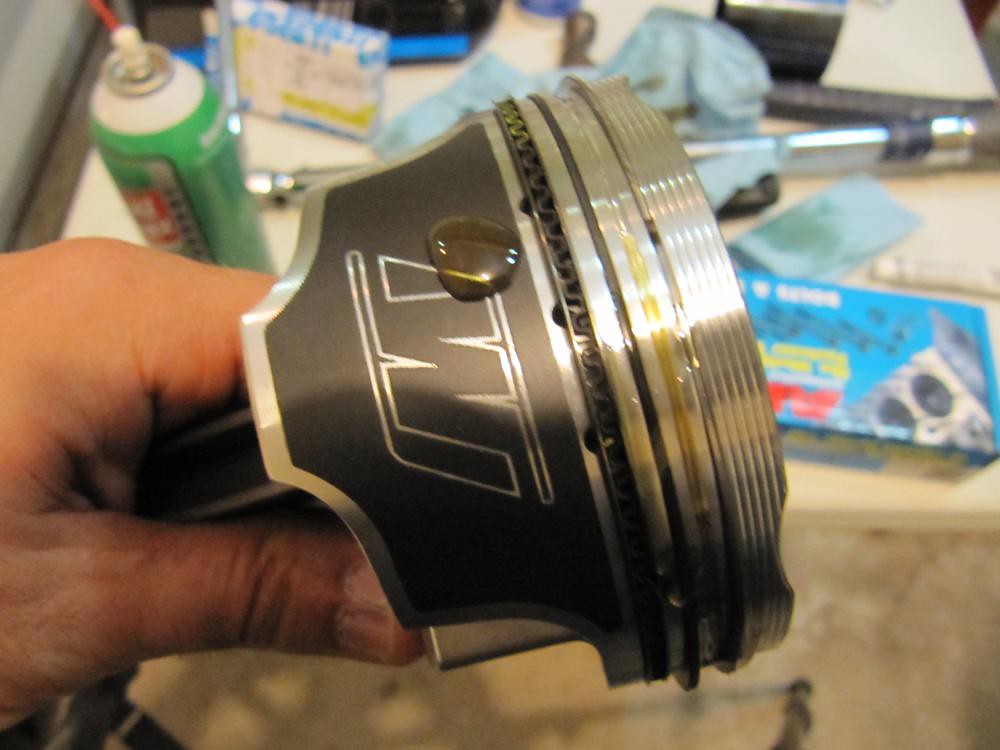 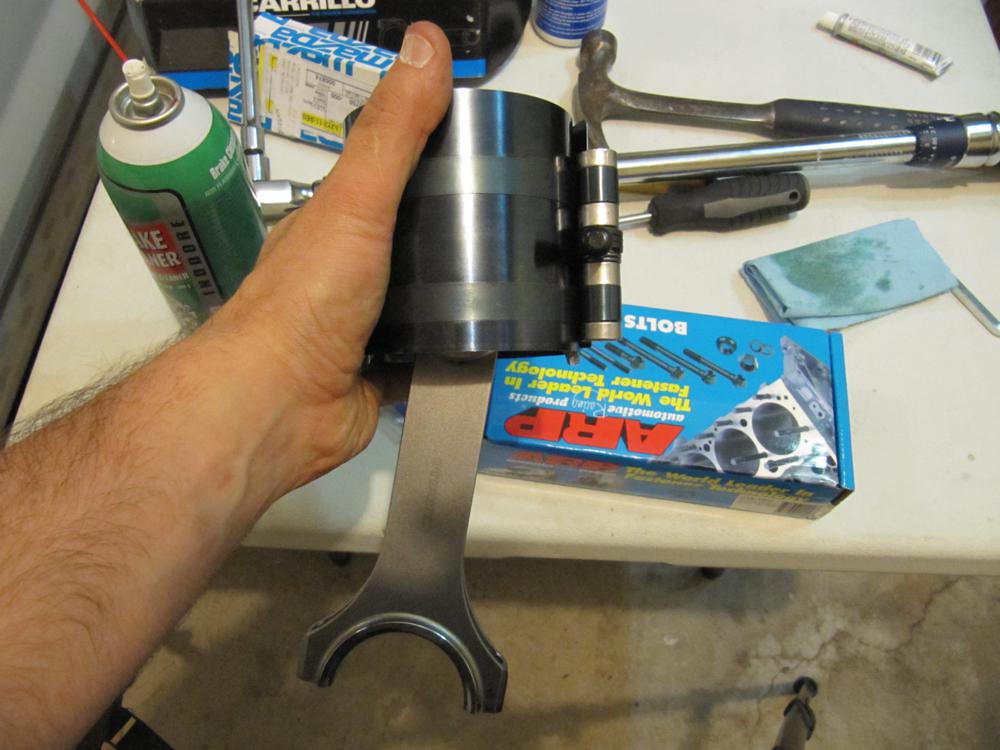  Stuff a shop towel down the cylinder bore to prevent the rod from nicking the crank when it drops in. Lube the inside of the cylinder wall with some motor oil then position the piston/rod combo with ring compressor on top. Ensure the ring compressor tool is perfectly centered AND that the valve reliefs on the piston tops are facing the PCV/water pump side of the engine.  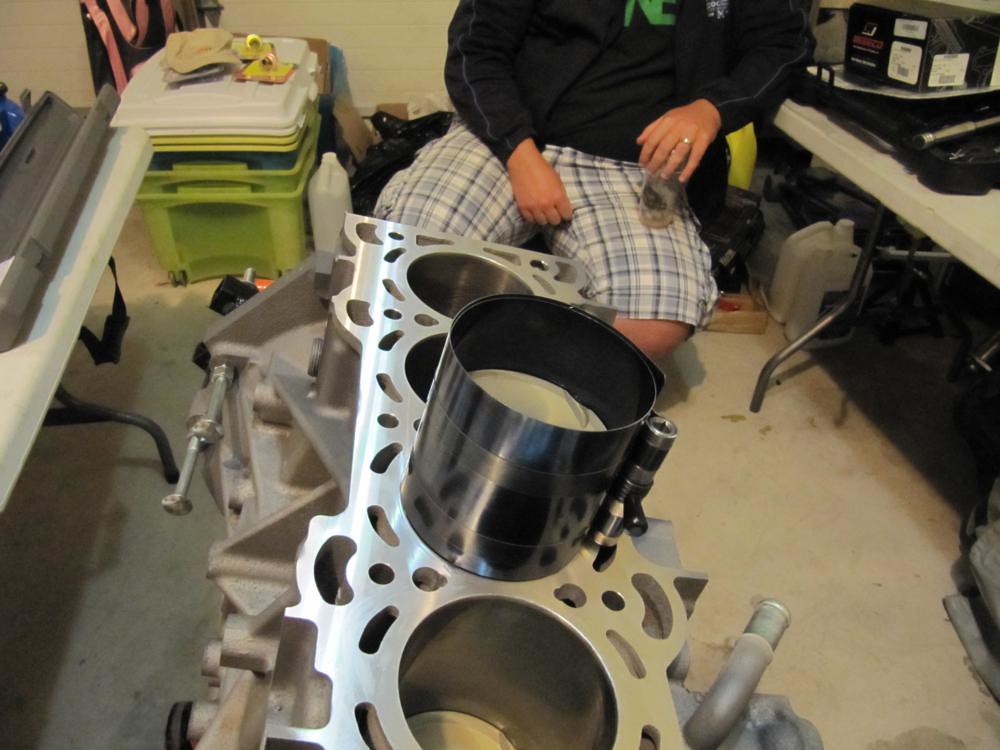 While holding the compressor tool with one hand, use the rubber handle of a hammer to gently tap the piston/rod down the cylinder bore. Competition Automotive said I could do it in one shot but I was too much of a wuss to do it that way; I went with the multiple-gentle-tap method. (not pictured unfortunately). IF you feel any sort of resistance while trying to tap the piston/rod down the bore, chances are one of the rings is resting on top of the block surface which is preventing the whole assembly from going in. Remove the piston/rod, reposition it in the ring compressor and try again. Once the piston/rod slides down the bore, flip the block upside-down, remove the shop towel and gently align the rod with the corresponding position on the crank. Note the super badass drill holes on the counterweight of the crank. This is done to balance the crank to within .1 grams. These holes are more exaggerated than the crank in OEM trim. 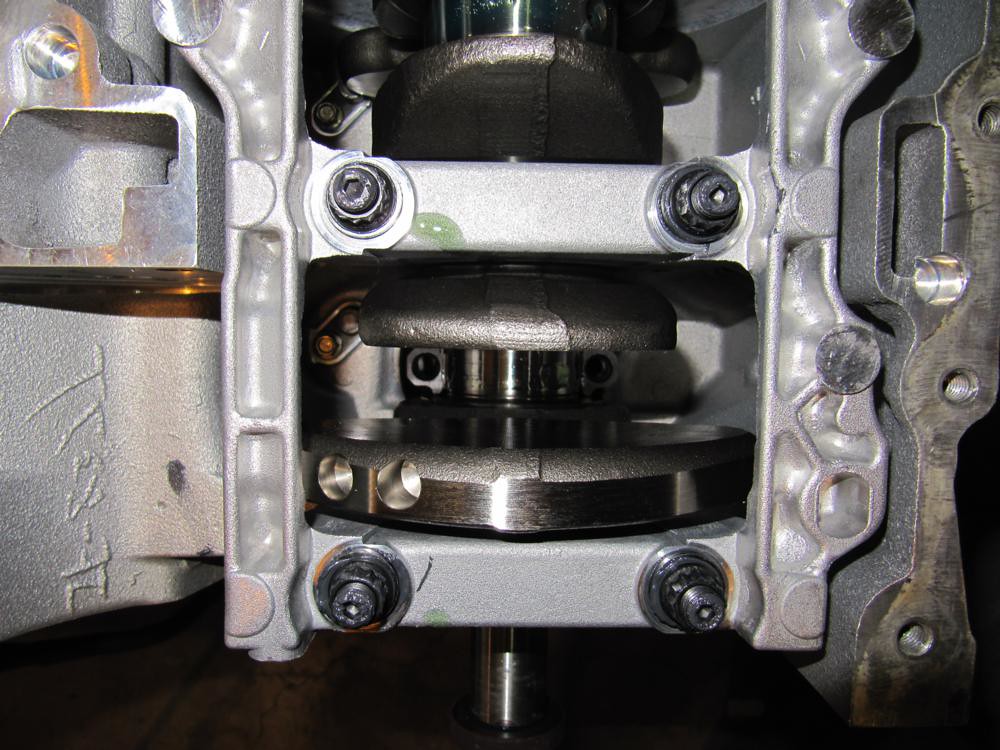 Apply lube to the exposed portion of the crank. 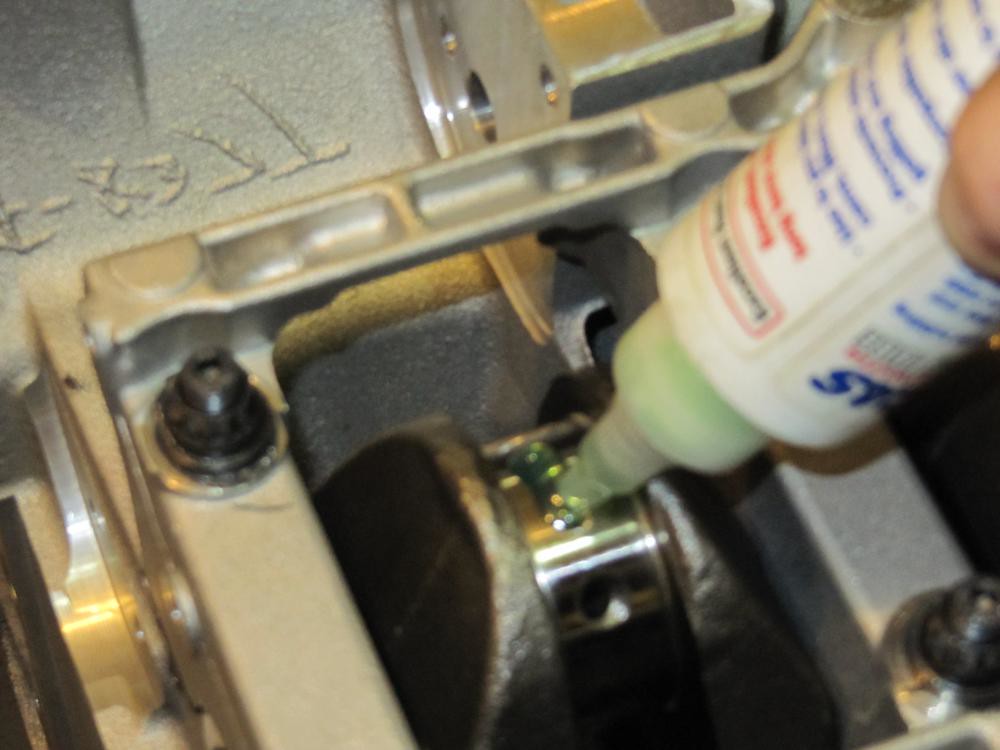 Apply lube to the innner AND outer sides of the corresponding bearing and press it into the corresponding rod cap (remember to align the notches in the bearing and cap). Mate the rod cap with the rod and tighten the rod cap bolts to spec. (not pictured; forgot. Bah) Generally, you are required to tighten the rod cap bolts to a specific "stretch" up to a certain amount of torque (in ft-lbs). I went with just under the maxiumum torque setting since I didn't have the tools to measure stretch. Cylinder 1 is done. Rotate the entire assembly with the crank pulley bolt to ensure there is no binding.  Repeat the same steps for cylinders 2-4. Once they're all in, rotate the entire assembly again and get blown away at the awesomeness of an assembled short block. Note the positioning of the intake valve reliefs of the piston tops; they are facing the PCV/water pump side of the engine. 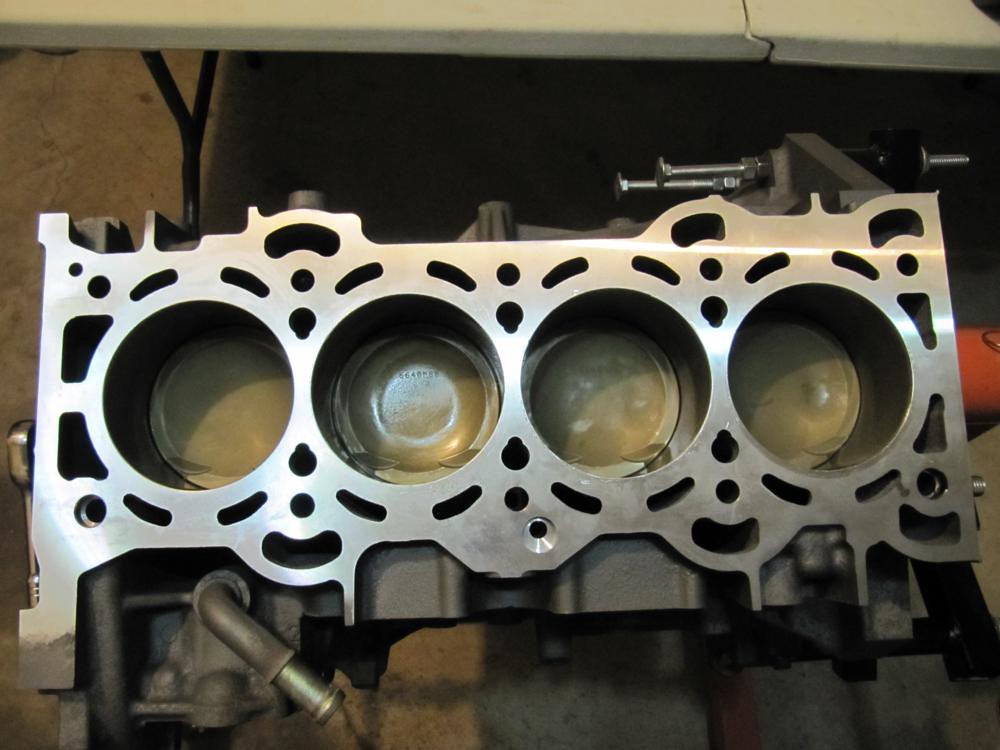 To be continued...
__________________ '07 CWP MS3 Forged. Last edited by BlueStreak; 01-16-2012 at 12:24 PM. Reason: MSF Database - Automerged Doublepost |

|   |
| The Following 103 Users Say Thank You to BlueStreak For This Useful Post: | 802MS3 (01-16-2012), Addikted To Boost (11-09-2014), adrianspd6 (01-17-2012), alien_sporez (01-17-2012), allo80 (02-14-2014), Alpha (01-16-2012), alphasaur (02-20-2013), altaprecision (03-25-2015), Arnie1229 (01-13-2015), AZSPEED3 (01-16-2012), BLKSTIG (06-05-2015), bluedjin419 (02-02-2014), BobtailedSnail (01-16-2012), breakfasteatre (12-30-2013), breakfstincluded (09-24-2013), CamSpeed360 (05-11-2013), castrocastro (01-17-2012), Cevaes_64 (08-16-2014), chaser27 (10-03-2014), Chimmike (01-16-2012), ChimmyChong (01-16-2012), crazyp (01-16-2012), Dahouse702 (01-17-2012), Dano (01-17-2012), DarkHeartMS6 (08-19-2012), dereeek (01-16-2012), DingoDave (05-14-2012), DISIindahead (01-16-2012), dougefresh_ (01-16-2012), EL F00LI0 (01-16-2012), Fail_6 (02-04-2012), fishin53 (01-17-2012), Funkster777 (04-14-2013), ganque (01-16-2012), goHAMM (07-07-2014), h.h.sk1nny (10-22-2013), Hamilton69 (01-17-2012), helmetface (02-04-2012), JacksonMS30 (01-16-2012), jeoje (07-04-2012), jerseymazda (01-16-2012), JTMS3 (01-16-2012), karl-hungus (01-18-2012), Karmat (01-16-2012), kritz (01-16-2012), Lex (01-16-2012), magicka (04-15-2012), MATT DAMOND (01-18-2012), Matx (01-16-2012), mazdafreak (06-24-2012), MD1032 (08-30-2017), Micha (10-11-2014), Miltron (09-30-2014), Mnassie (02-22-2019), Monotonous ONE (01-17-2012), mr.speedy3 (04-01-2014), MS3-a(sore)ASS-rex (01-16-2012), ms3blackmica (02-24-2013), Ms3_Miami (05-12-2012), navyspeed3 (04-03-2013), Night Wolf (01-17-2012), nindoja (01-16-2012), Noddaford (01-18-2012), Novej (01-25-2012), omgvance (04-09-2012), p057 (08-19-2012), prosper0 (01-15-2016), Roonster (08-25-2012), rtabagaboy (01-17-2012), S-hendrix (06-10-2012), Sacrilicious (01-16-2012), Scribbles (02-04-2012), Shin Gouki (01-16-2012), Sid3wayS (01-16-2012), silvapain (01-16-2012), Sleepin6 (01-22-2017), SLOWHATCH (01-17-2012), Speed3eak (07-21-2012), speedcig (06-18-2013), SpeedRebirth (05-10-2013), Squid (02-24-2012), SweetJP (01-16-2012), TexasSpeed3 (04-08-2012), the public enemy (02-22-2015), themytb (01-16-2012), theschrum (03-17-2012), TiGraySpeed6 (01-16-2012), timjs (11-03-2013), Tokay444 (01-16-2012), Tomas (02-03-2012), torquemaniac (11-19-2013), trf5000 (01-16-2012), uncorked11 (01-16-2012), Vader (01-17-2012), Voltwings (05-14-2015), VulgarKyle (07-09-2013), wankular (01-17-2012), WetzMS3 (10-10-2014), wolly6973 (01-17-2012), Yamahafreak (08-16-2016), zatara (01-17-2012), Zoom66 (05-13-2015), zpele (01-18-2012) |
|
01-16-2012, 11:49 AM
| #2 | |
| Join Date: Sep 2008 Location: Toronto, Ontario, Canada
Posts: 1,467
(View Stats)
iTrader: (1)
Rep Power: 2202 Thanks: 4,767
Thanked 4,088 Times in 1,066 Posts
Groans: 2
Groaned at 2 Times in 2 Posts
(Thread Starter) | Neutral : +1 score Flip the block upside-down again and fasten the oil pump to the block. Don't forget to attach the black plastic pick-up tube as well. The only thing left on the bottom of the block is the oil pan. Flip the block right side up when done. 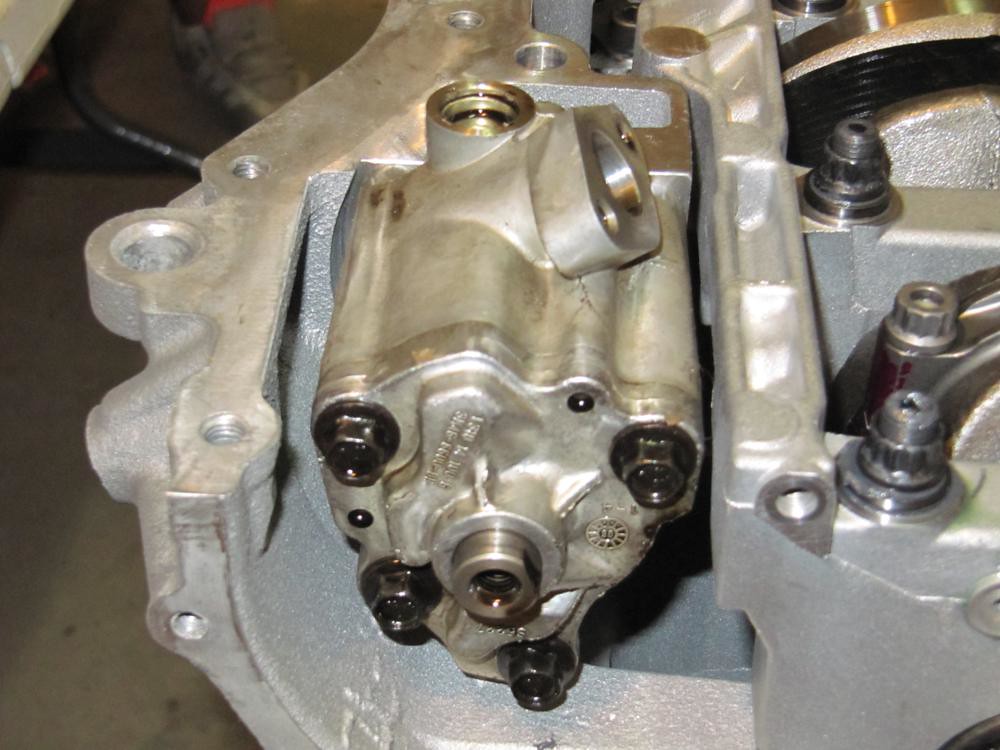 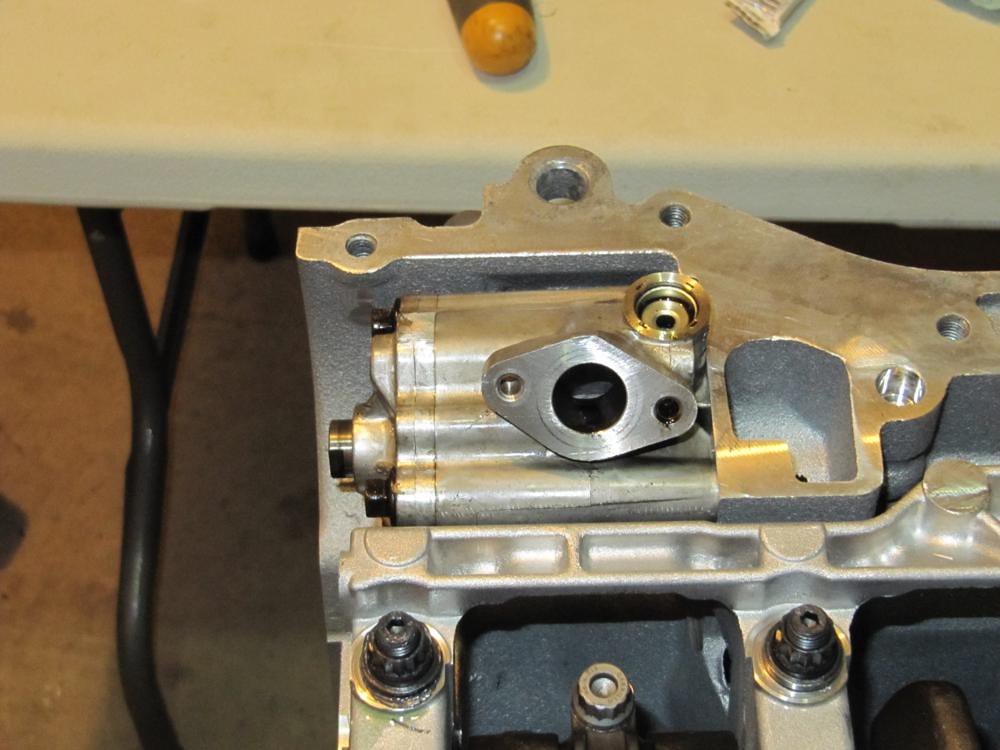 Next up are the ARP Head Studs (they are longer than the mains). Use the same approach as the mains. Apply ARP Ultra-Torque Lube to the threaded portion of the stud on the side without the hex and thread it in by hand. Again, tighten the studs by hand until they bottom out. Do not go any further. Apply ARP Ultra-Torque Lube onto the exposed threads of the studs.  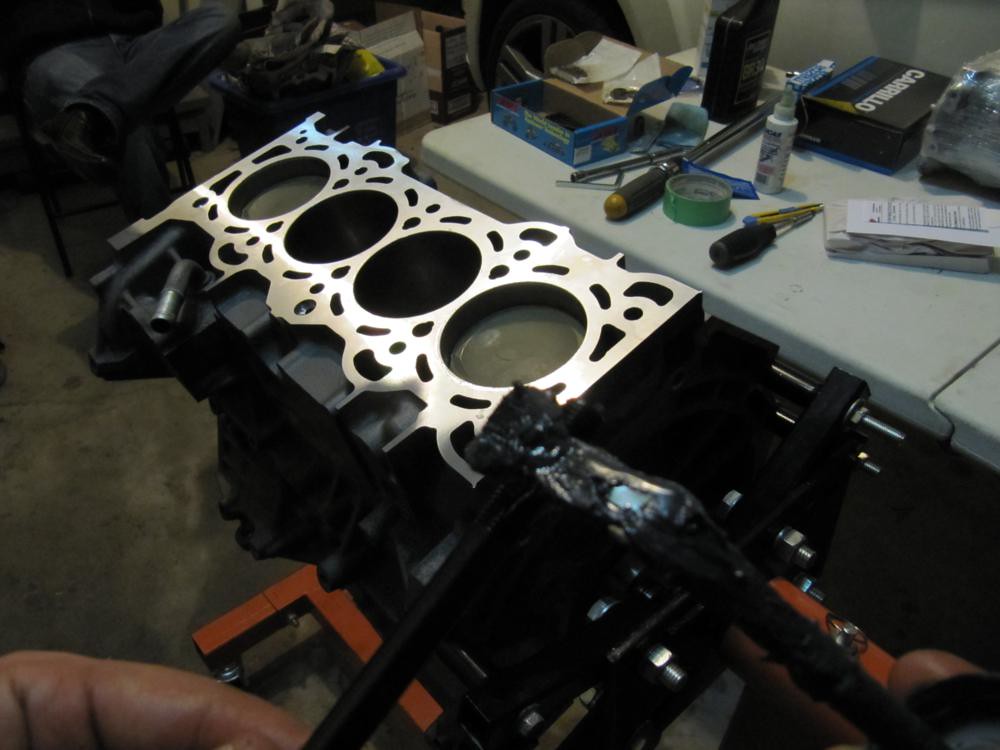 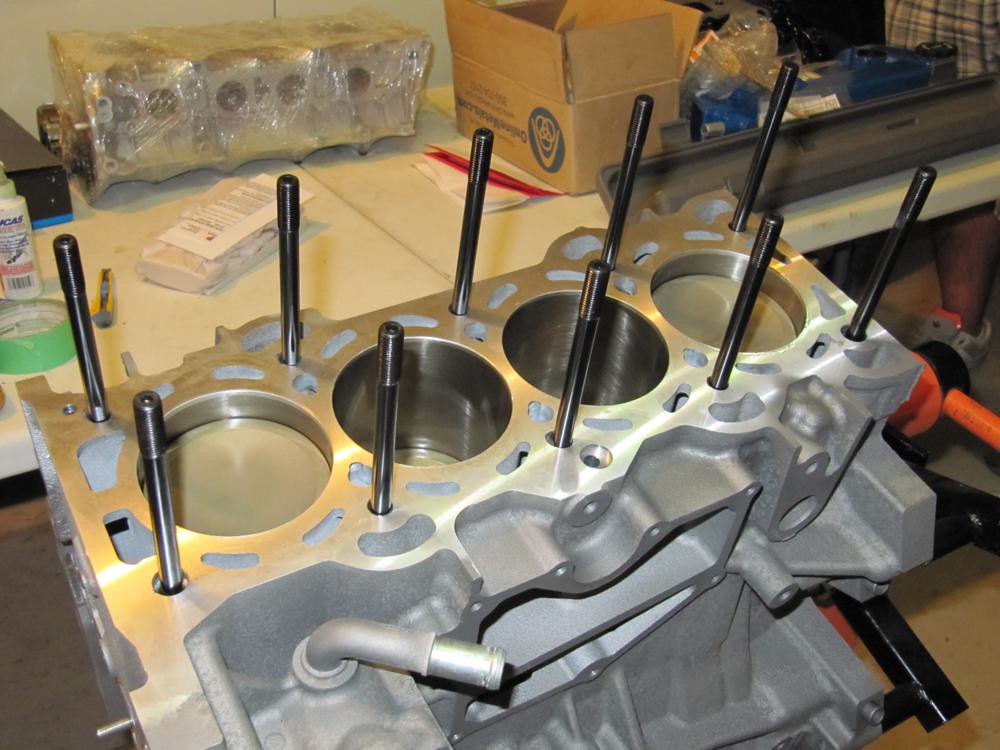 Slide on the head gasket. 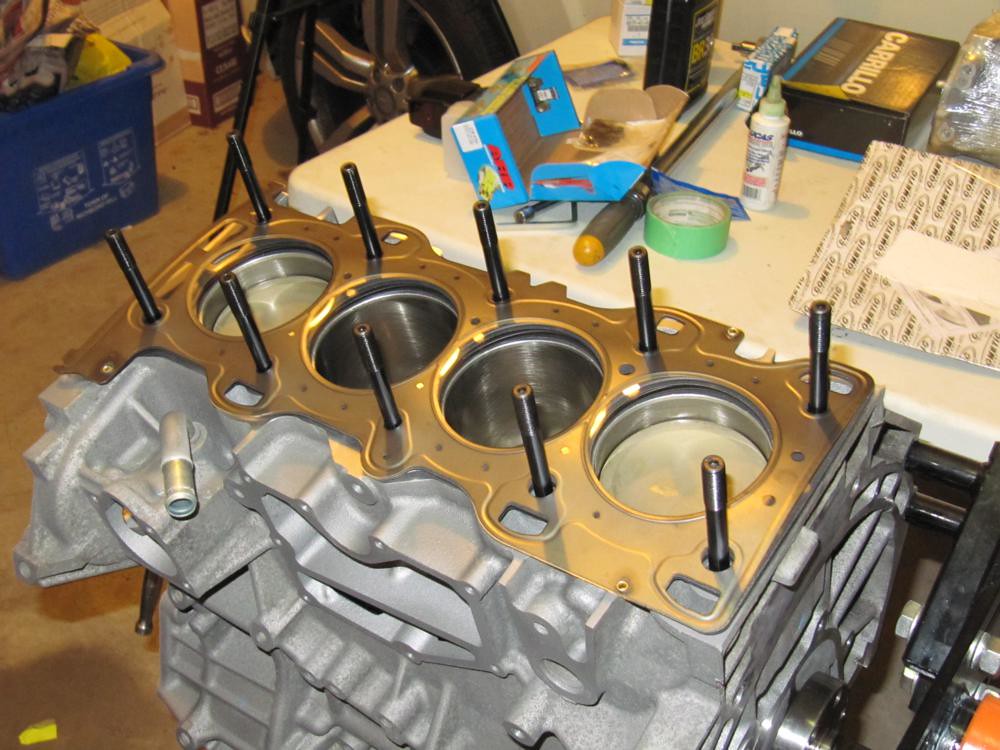 Insert the TDC crank tool into the proper blind plug hold in the side of the block adjacent to cylinder 1. Rotate the crank until the counterweight makes contact with the tool. Visually inspect the position of cylinder 1 to ensure you're at TDC. 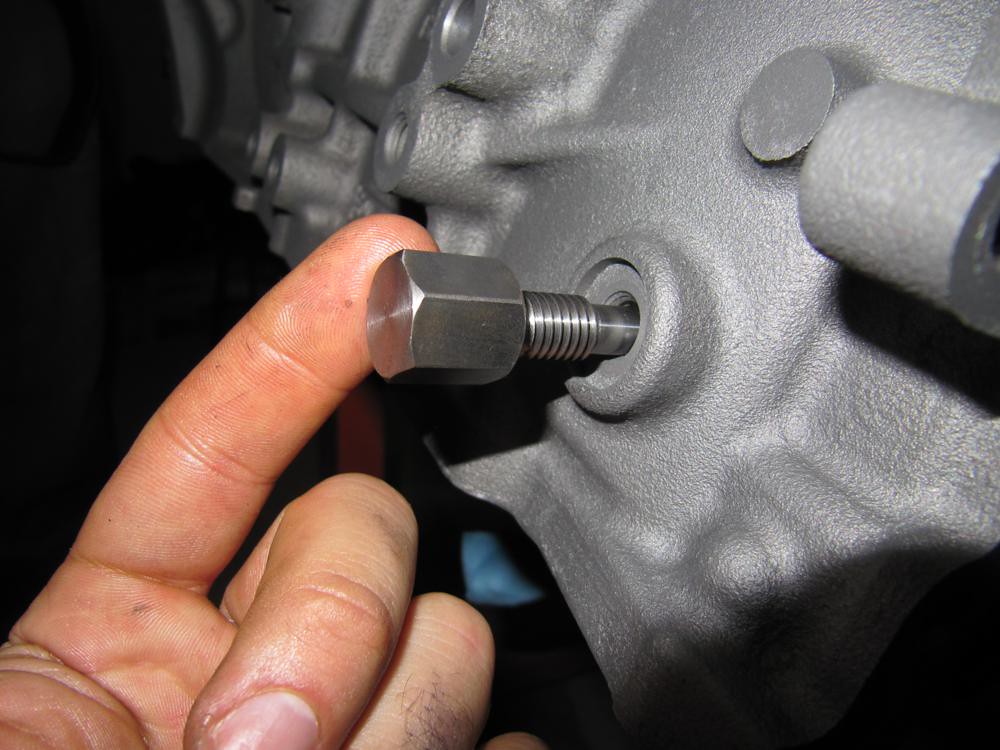 Slowly lower the head onto the shortblock. In this picture the cams are on the head but they are not tightened down. You could just as easily remove the cams BEFORE putting the head on the block (they will have to be removed for the next step anyways). 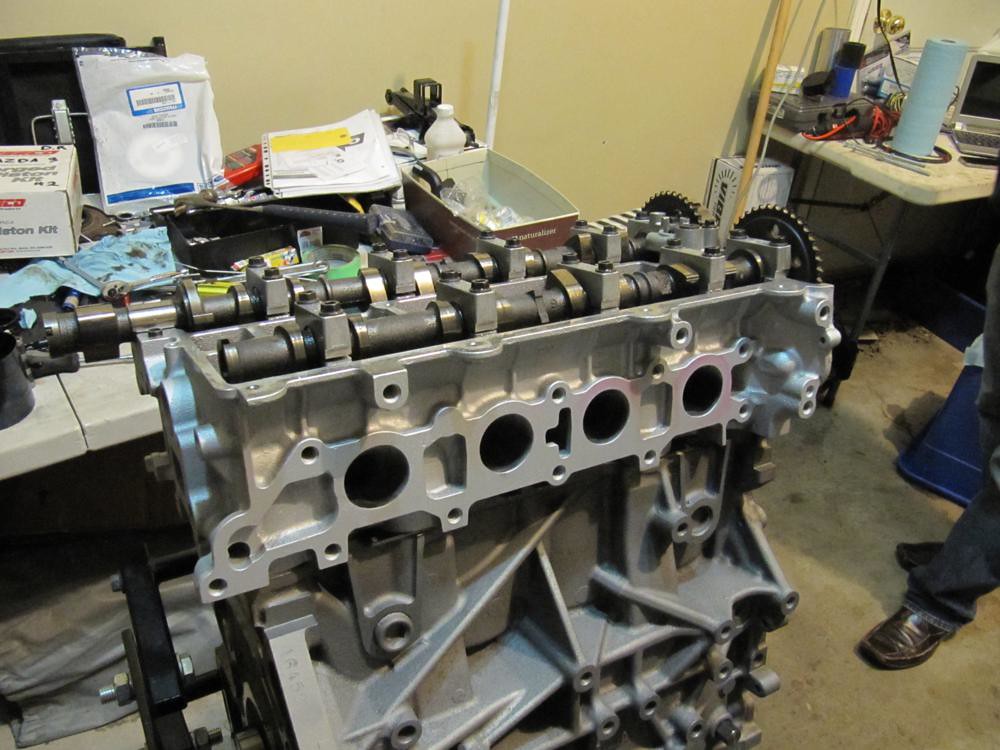 Remove the cams and caps and set them aside... Place one (supplied) washer onto each head stud. Apply lube to the nut head, the threads and the socket to make it easier to fasten. If you don't lube the socket, it'll be a PITA since the nut will keep falling out. Thanks to DJ for that suggestion. 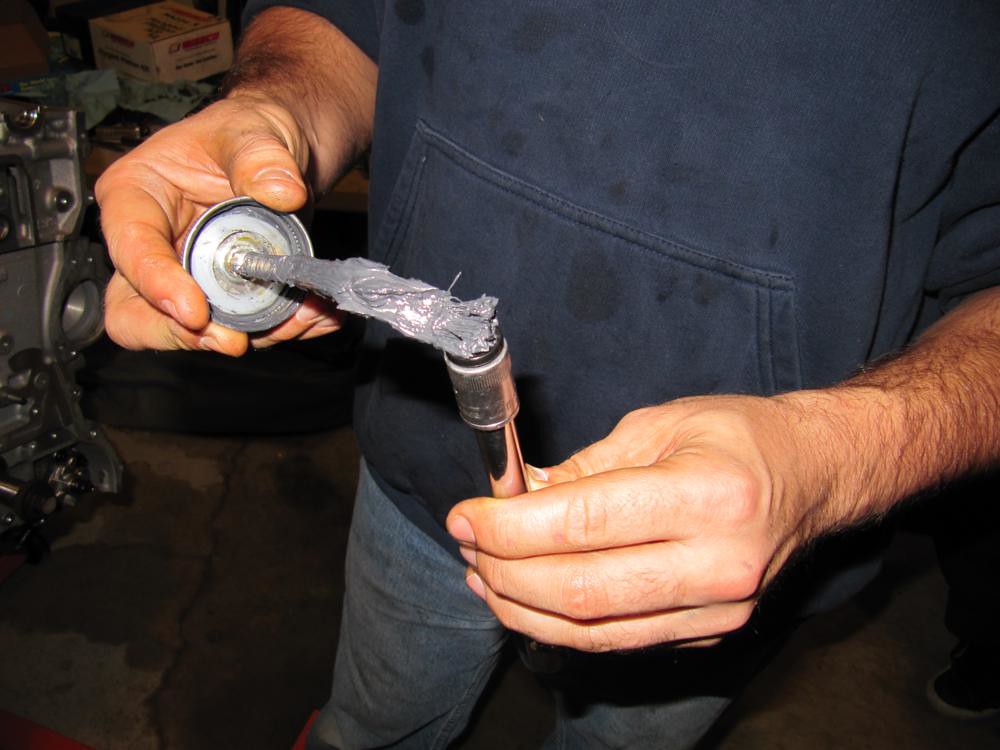 Hand tighten the nuts into the studs then torque them in 3 passes to 60ft-lbs using the order below. Other have tightened the head studs to 80-90ft-lbs to prevent the head from lifting at high boost. I've been running 25PSI through my setup using ARPs recommendation and haven't had an issue so far. 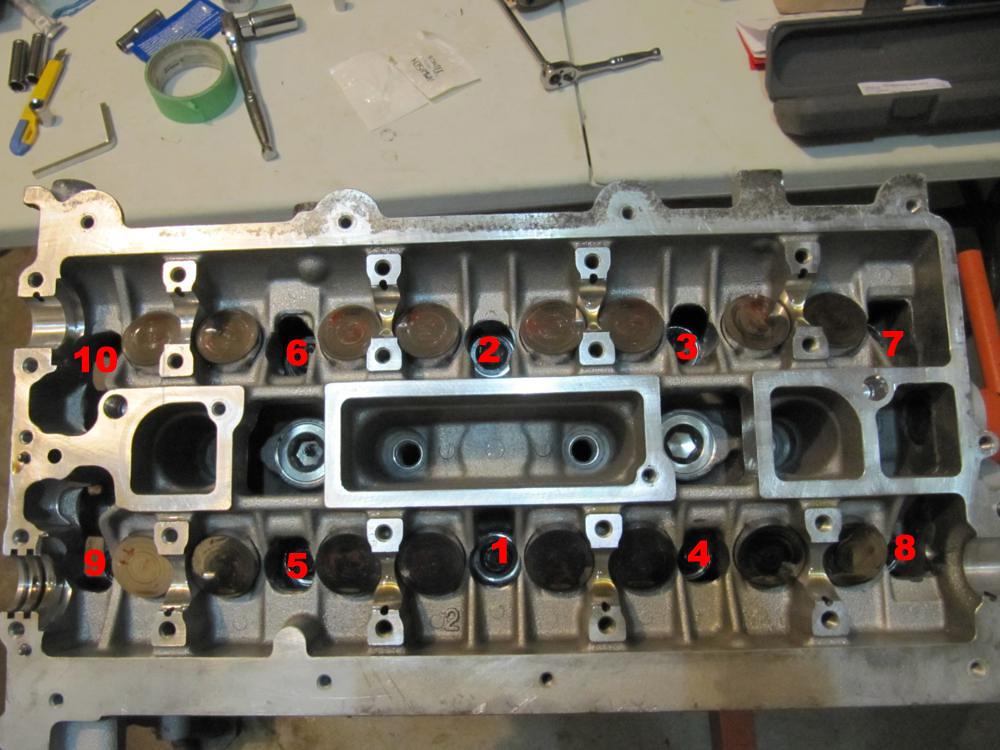 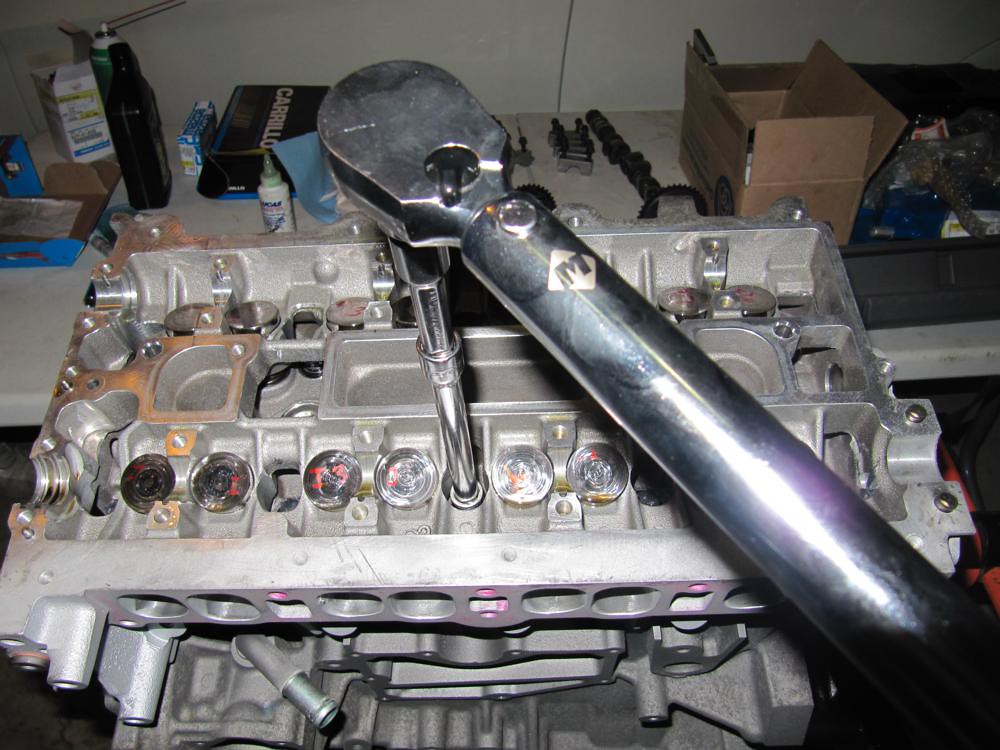 If you haven't dropped in the valve buckets, do so now. Make sure they were labelled before the engine was disassebled (Intake 1, Intake 2 etc... and Exhaust 1, Exhaust 2 etc...) as you have to put them back in the exact order for proper valve lash. If you forgot which goes where, god help you. 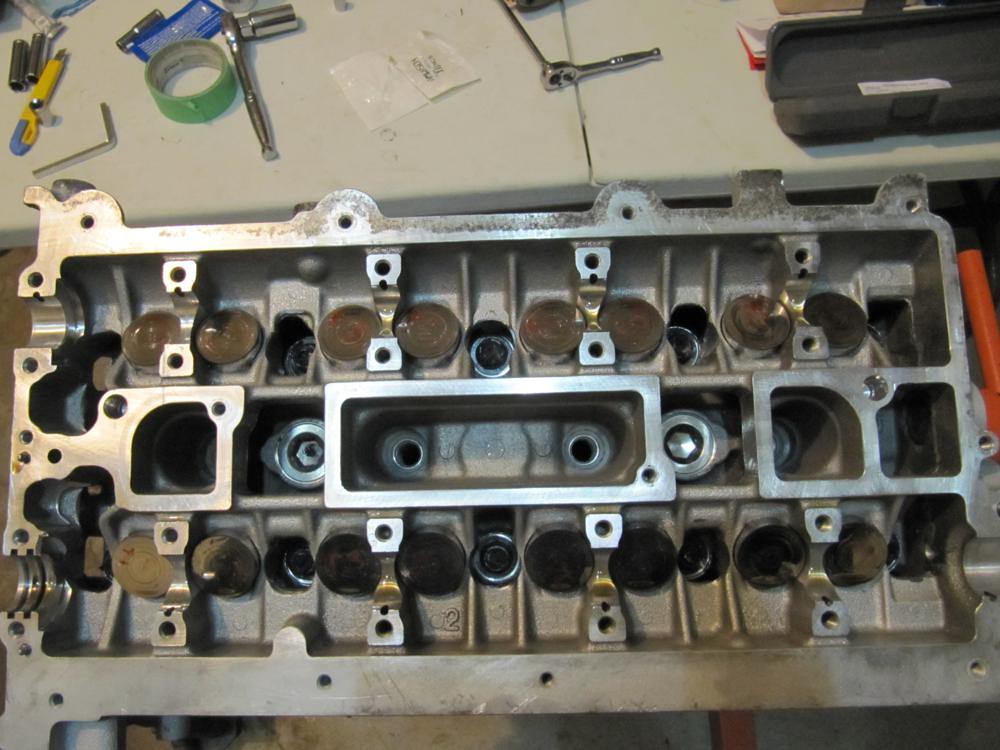 If you ordered a DCR VVT upgrade, you can swap it in now. Start off by drawing two lines that extend from the cam and onto the back of the VVT sprocket where the two mate. This will act as a reference for the new VVT since it the new one has to be oriented EXACTLY (!!!) like the original. 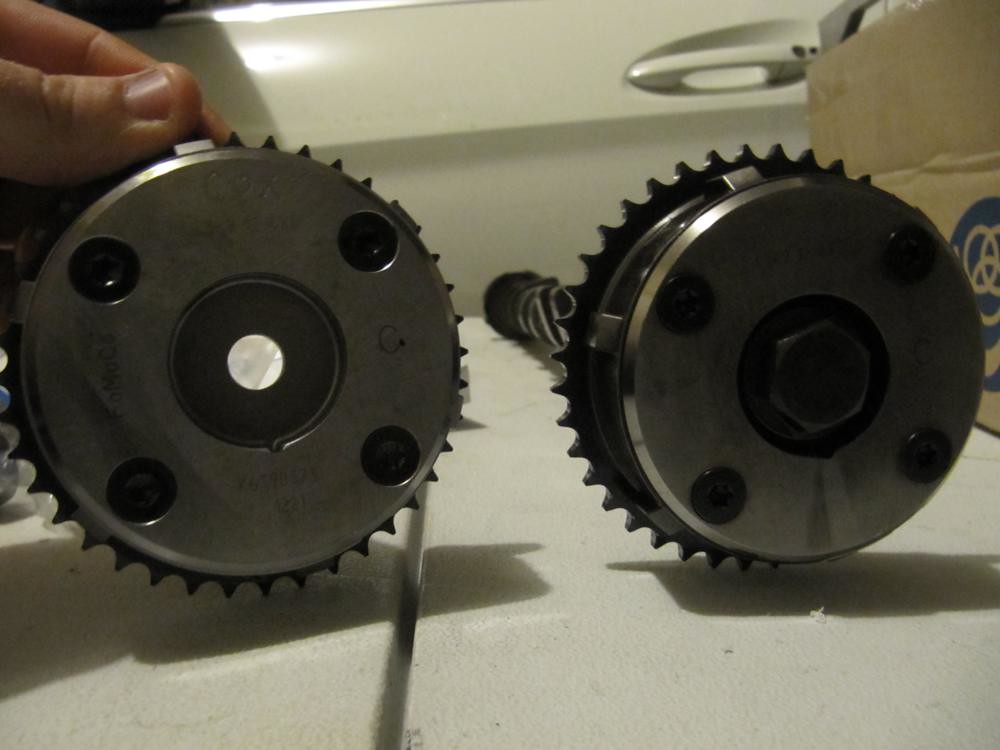 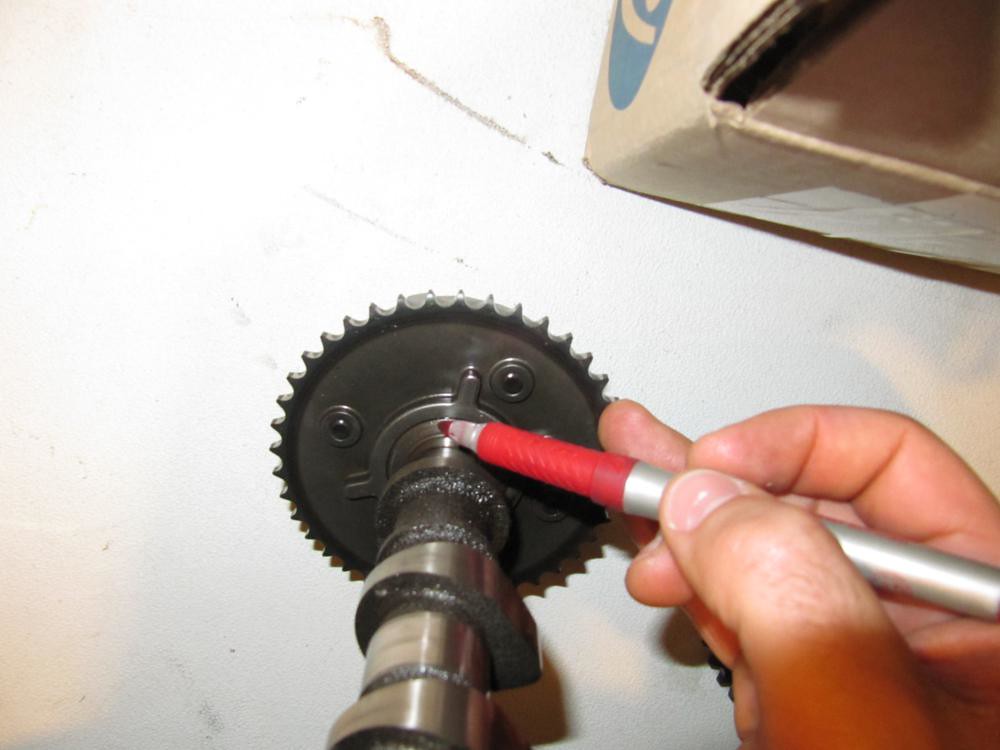 Use an adjustable wrench or open end wrench to secure the cam with one hand (on the hex portion of the cam) and a ratchet on the other. It shouldn't take too much effort to get it loose. There's a friction washer in there; replace it with a new one. 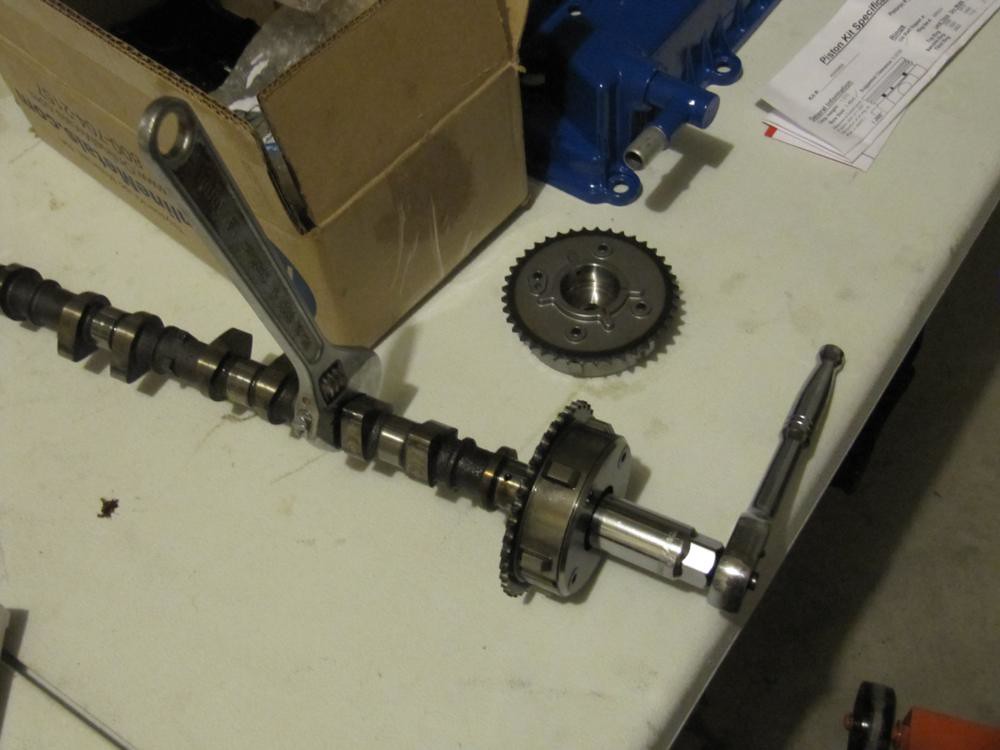  There's a chance that the crank may have turned since you last secured it to the TDC SST. Go back and make sure that cylinder 1 is at TDC. 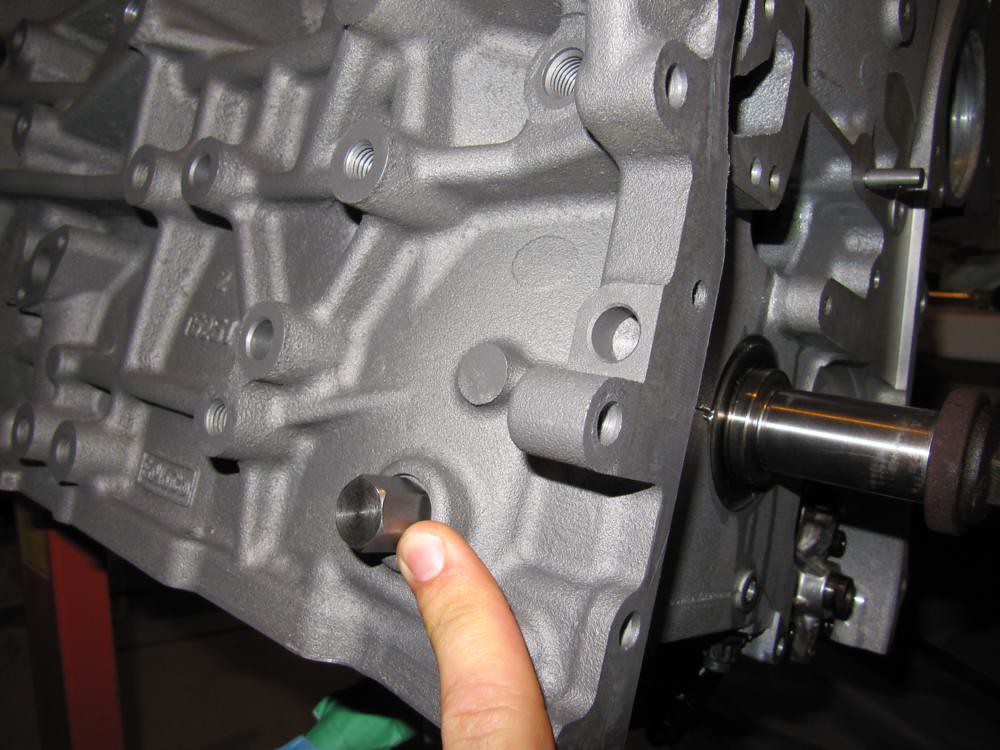 If, like me, you don't have a table vise, throw the intake cam on the head. Securing the cam to the head will act as a third hand for the steps that follow. Ensure the orientation of the intake cam lobes look like the following and throw on the SST onto the back of the cam prior to torquing the cam caps onto the head. (Ignore the fact that the exhaust cam is on the head for the moment; I didn't have a picture without). IF you torque down the intake cam without ensuring that a) cylinder 1 is at TDC and b) the cam lobes are aligned as pictured, there's a very high chance the valves will make contact with the pistons and you'll end up bending the valves.   Slide on the DCR VVT (properly aligned - remember those markings you made?), secure the cam with a wrench then tighten the cam bolt to 50ft-lbs using a torque wrench. After you have tightened it, make sure the VVT didn't rotate relative to the markings on the sprocket/cam. 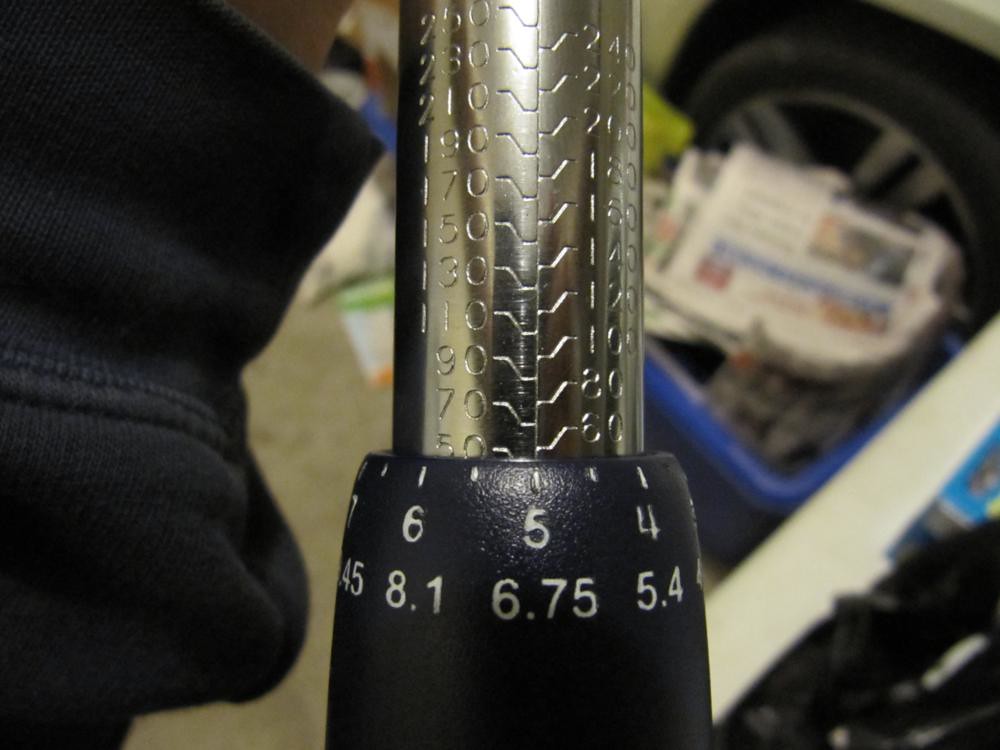 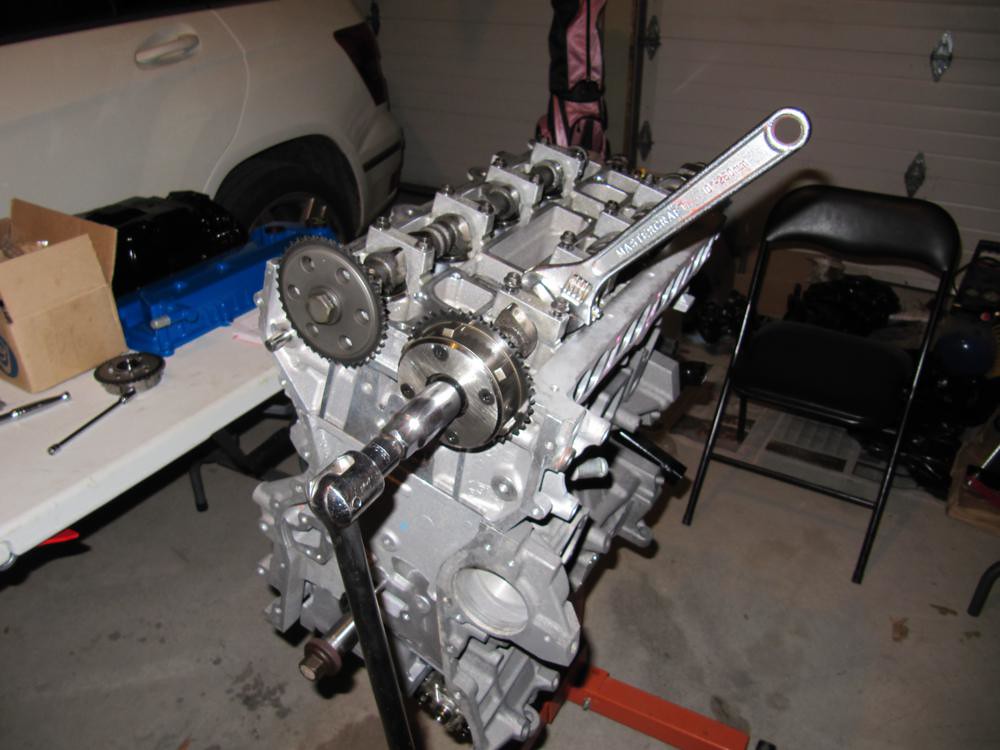 Next, install and secure the exhaust cam onto the head (see previous photos for proper cam lobe orientation). Loosen the bolt securing the exhaust sprocket to the cam. Do not remove the sprocket, though. Just let it freewheel for now. Make sure you tighten the cam caps while the cam is aligned with the SST. 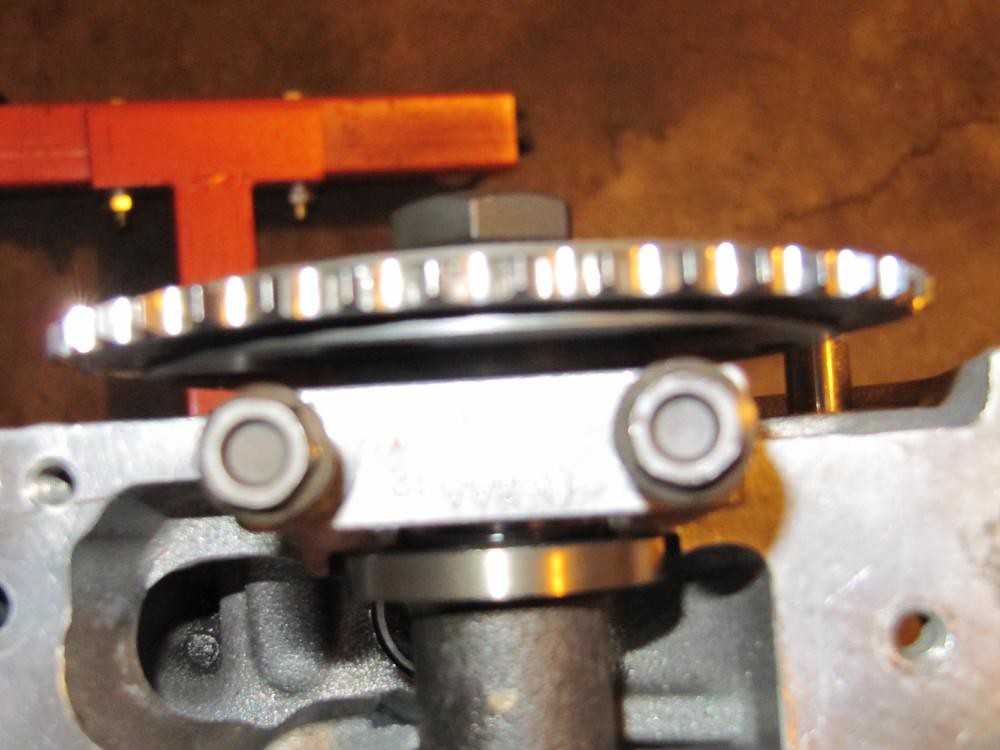 Install the VVT actuator onto the head. 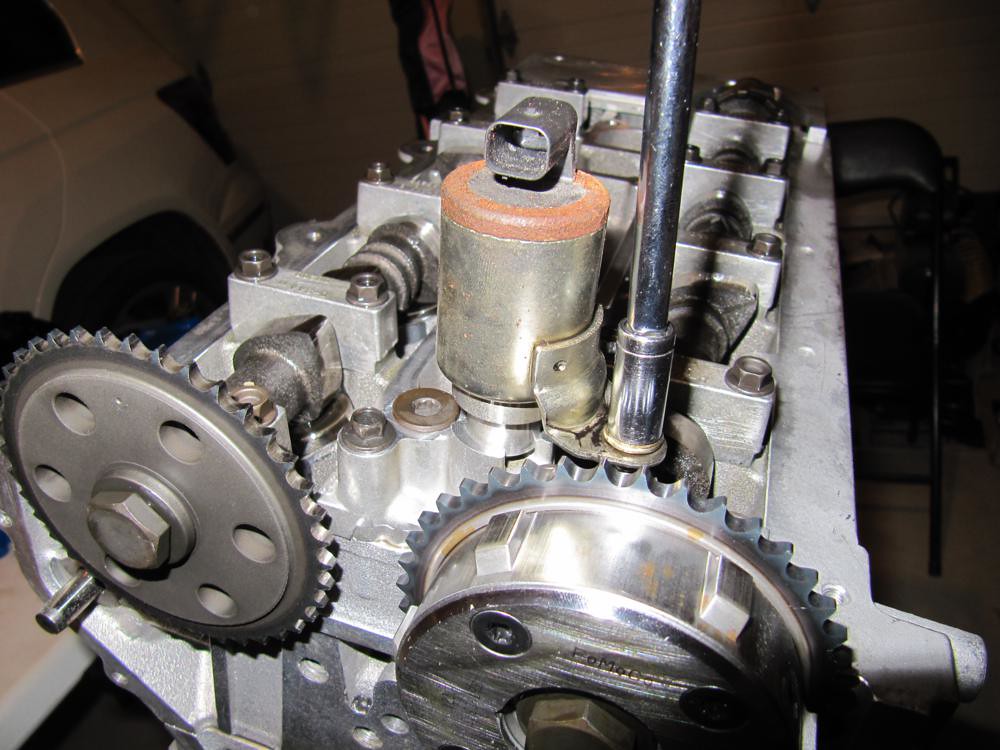 Remove the crank pulley bolt from the crankshaft. There's a chance that when backing out the bolt, the crank will turn slightly and no longer be at TDC. Reach underneath the block and push on the balance shaft gear to ensure cylinder 1 is still at TDC. This is very important. (not pictured) Slide one (new) friction washer onto the front of the crank then the oil pump sprocket. Ensure you're putting on the oil pump sprocket and not the timing chain sprocket; they are different. 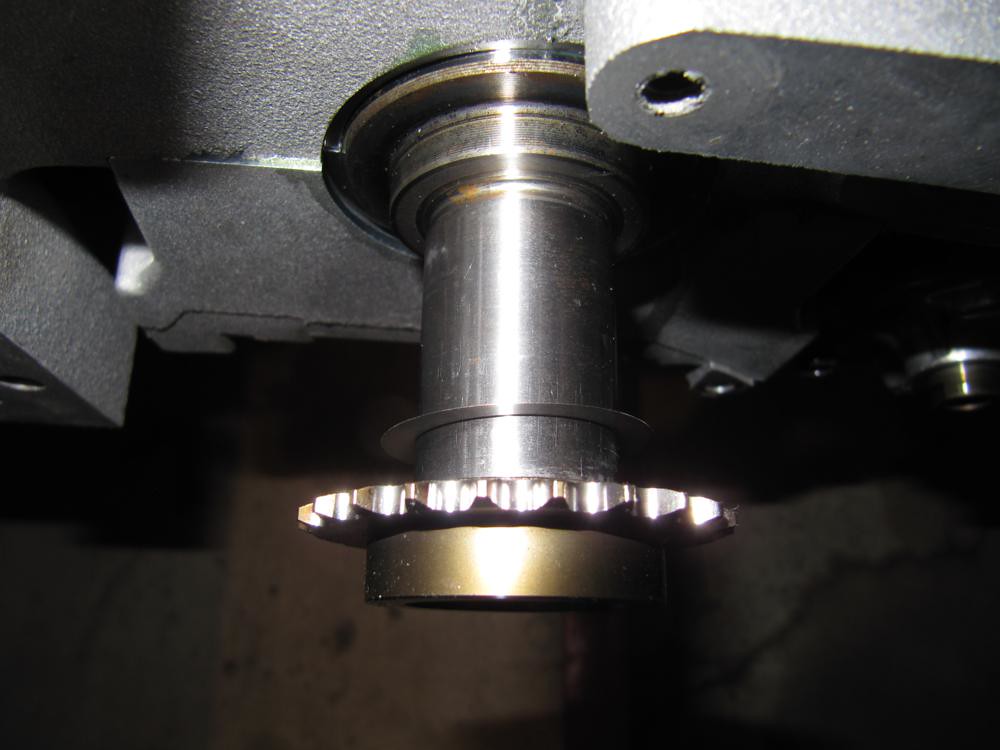 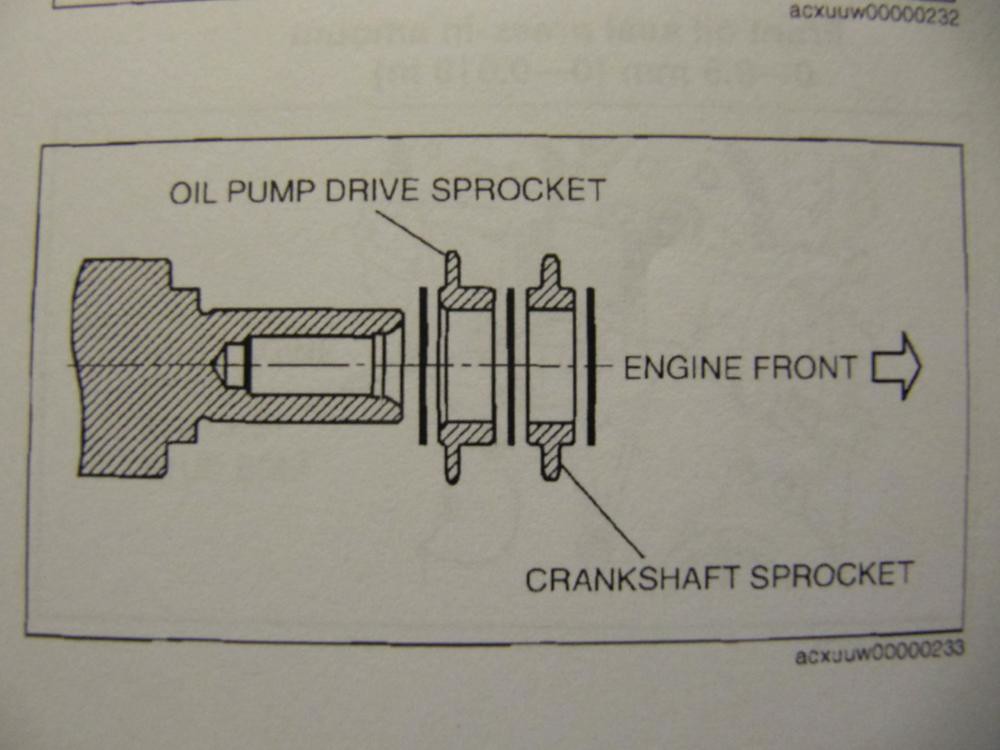 Dangle the oil pump chain onto the crank sprocket then install the keyed oil pump sprocket onto the oil pump. There's a SST for this but I just jammed a screwdriver through the keyed sprocket and tightened the bolt; torque specs aren't that high. See the manual for the proper torque. 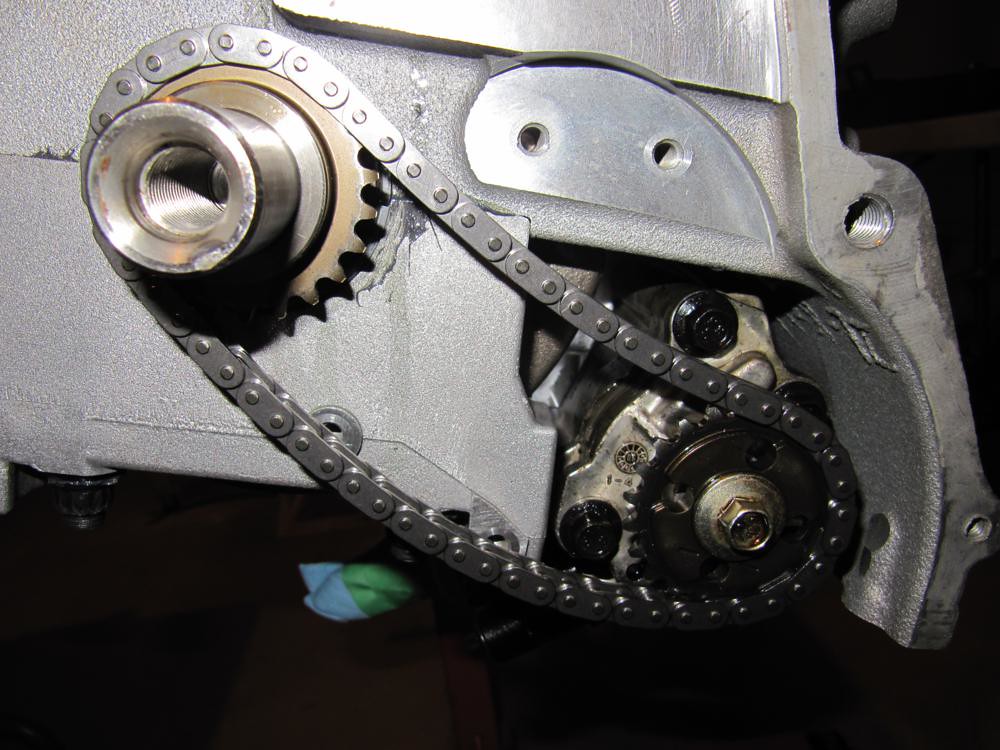 Install the oil pump chain guide (black piece on the bottom) and the tensioner (orange thingy). Be sure to add some assembly lube where the chain meets the guide. Its straight forward hence the automotive terms like "black piece" and "orange thingy"... 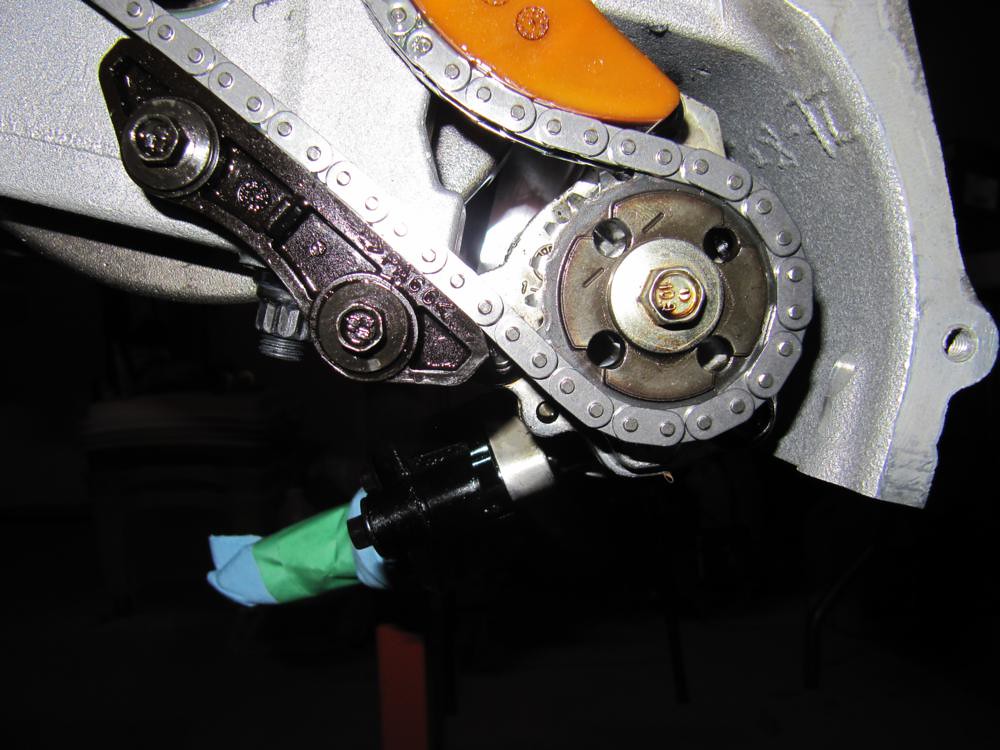 Dangle the timing chain on the intake/exhaust sprockets.  Slide another friction washer onto the front of the crank then insert the timing chain sprocket with the timing chain attached. You should be able to get it on after a few F bombs. 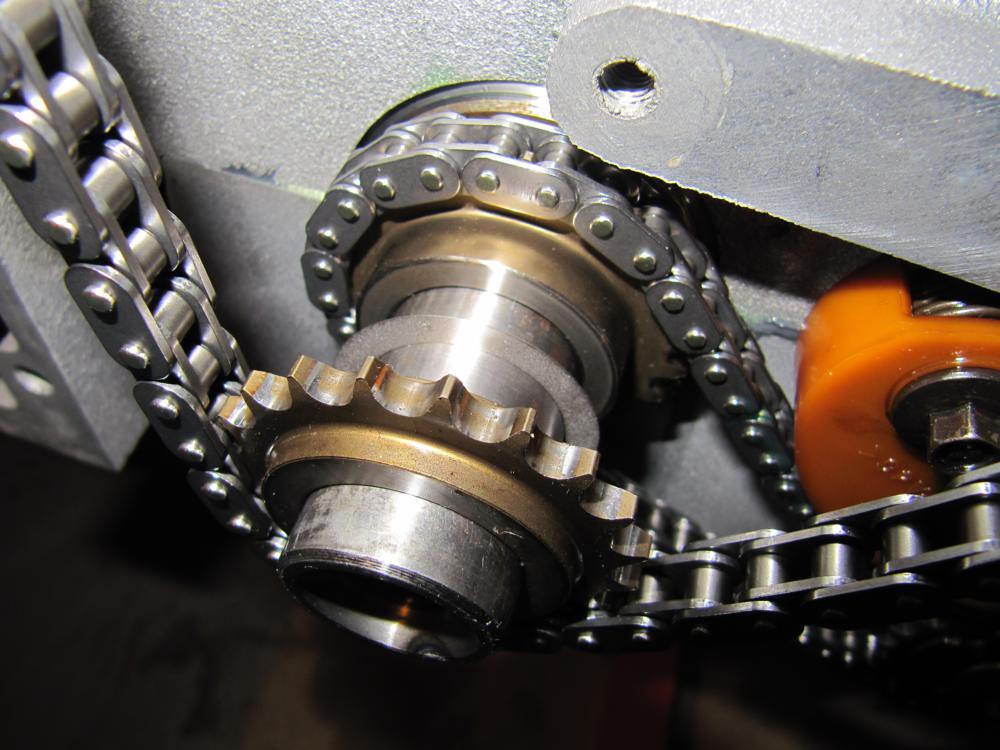 Slide on the last friction washer. 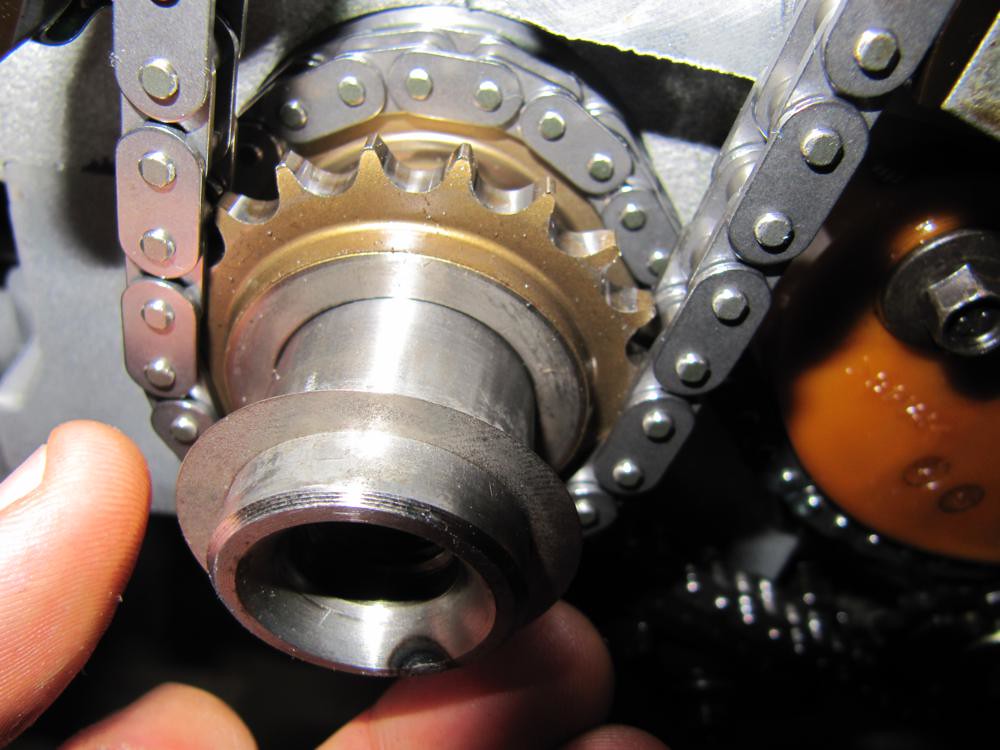 Attach the timing chain guide (on the right) then the tensioner arm on the left (add some assembly lube onto the surface where the chain meets the guide). The guide on the right is secured by two bolts and the tensioner arm on the left just slides onto the dowel pin on the head. 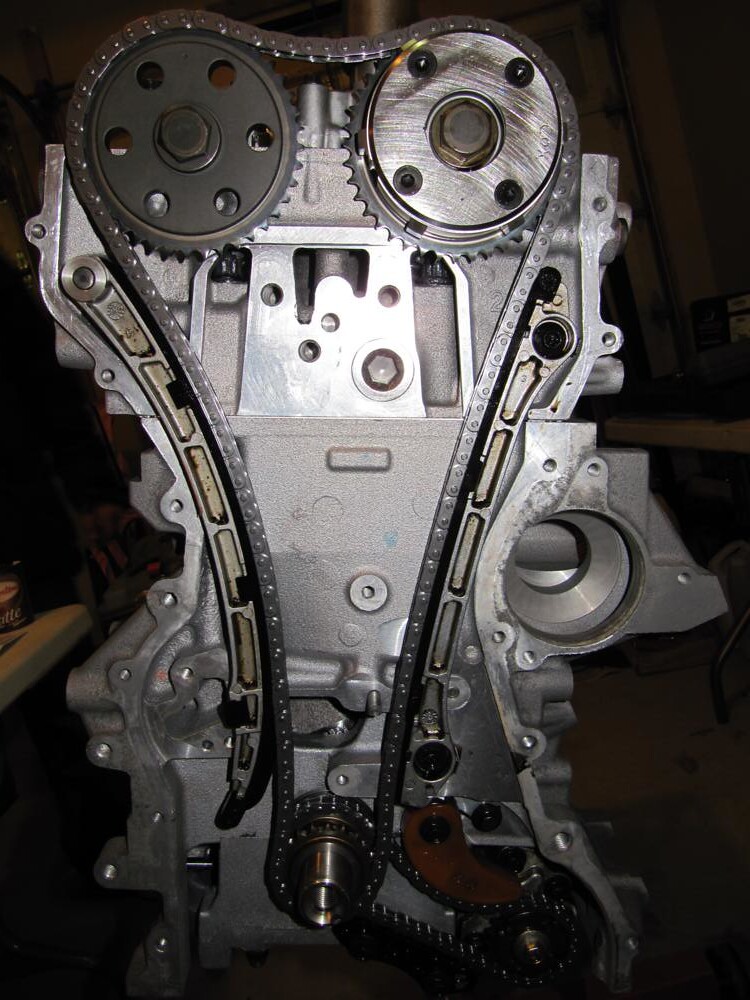 Compress the timing chain tensioner and jam it with a paper clip on the locking mechanism (not pictured; shoot). Install the tensioner onto the block then remove the paper clip. The tensioner should push out onto the tensioner arm and make the timing chain taut. 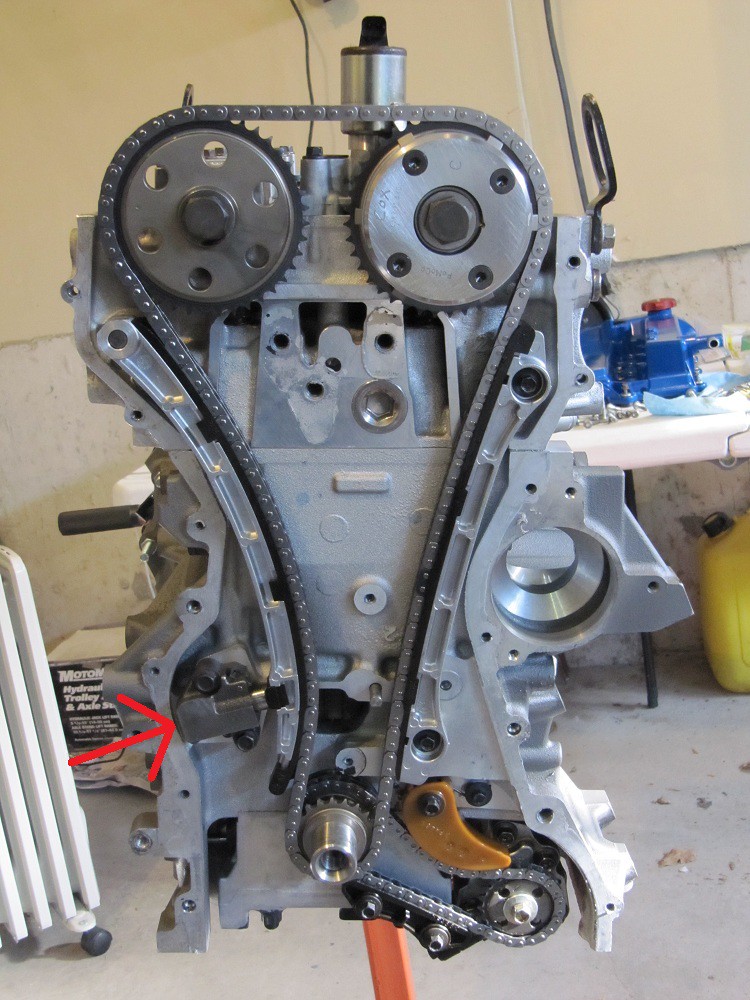 Insert a new front seal onto the timing chain cover, spread a bead of Permatex sealant around the perimeter of the cover as well as the interior bolt holes then install it on the block. See the instruction manual for proper front seal depth and bolt size placement. 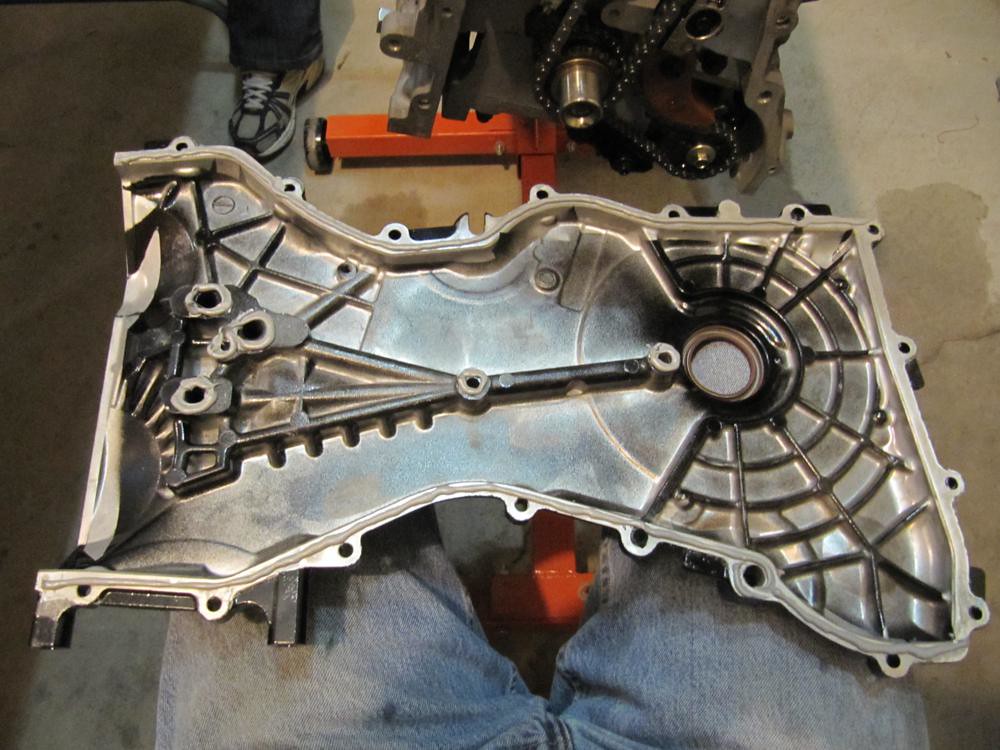  To be continued...
__________________ '07 CWP MS3 Forged. Last edited by BlueStreak; 01-17-2012 at 12:02 PM. |
|
| |
| The Following 55 Users Say Thank You to BlueStreak For This Useful Post: | 59ksmall (01-17-2012), 86AmishMs3 (05-12-2012), adrianspd6 (01-17-2012), alphasaur (02-20-2013), altaprecision (04-22-2015), bluedjin419 (02-02-2014), BobtailedSnail (02-05-2012), Broxer (05-23-2012), CamSpeed360 (05-11-2013), chaser27 (10-03-2014), Dahouse702 (06-02-2013), Dano (01-17-2012), DingoDave (05-14-2012), dougefresh_ (01-17-2012), Fail_6 (02-04-2012), fishin53 (01-17-2012), Funkster777 (04-14-2013), fywdyl (01-18-2012), g00s3y (02-24-2017), goHAMM (07-07-2014), helmetface (02-04-2012), JacksonMS30 (01-18-2012), karl-hungus (01-18-2012), magicka (04-15-2012), MATT DAMOND (01-18-2012), mazdafreak (06-24-2012), MD1032 (08-30-2017), Micha (10-11-2014), Miltron (09-30-2014), Mnassie (02-22-2019), mr.speedy3 (04-01-2014), MS3-a(sore)ASS-rex (01-20-2012), ms3blackmica (02-24-2013), navyspeed3 (04-03-2013), Novej (01-25-2012), p057 (08-19-2012), prosper0 (01-15-2016), rtabagaboy (01-17-2012), Scribbles (02-04-2012), SLOWHATCH (01-17-2012), speedcig (06-18-2013), Squid (02-24-2012), stp (04-09-2012), TexasSpeed3 (04-08-2012), theschrum (03-17-2012), TiGraySpeed6 (01-17-2012), torquemaniac (11-15-2013), trf5000 (01-17-2012), Vader (01-17-2012), VulgarKyle (07-09-2013), wankular (01-17-2012), WetzMS3 (10-10-2014), Yamahafreak (08-16-2016), zatara (01-17-2012), zpele (01-18-2012) |
|
02-04-2012, 12:19 AM
| #3 | |
| Bob Ross Fanclub  Join Date: Jan 2009 Location: SEFL
Posts: 3,811
(View Stats)
iTrader: (8)
Rep Power: 4333 Thanks: 4,534
Thanked 8,223 Times in 2,349 Posts
Groans: 0
Groaned at 35 Times in 20 Posts
| Not Ranked : 0 score
How do you adjust valve clearance on these heads? (if you even have to?) What are the tolerances here and how do you make sure "valve lash" is within spec if one is starting a new head with say new valve buckets?
__________________ | |

| |
| The Following User Says Thank You to Tomas For This Useful Post: | BlueStreak (02-04-2012) |
|
01-16-2012, 11:54 AM
| #4 | |
| Join Date: Sep 2008 Location: Toronto, Ontario, Canada
Posts: 1,467
(View Stats)
iTrader: (1)
Rep Power: 2202 Thanks: 4,767
Thanked 4,088 Times in 1,066 Posts
Groans: 2
Groaned at 2 Times in 2 Posts
(Thread Starter) | Neutral : +1 score Ok. So this is where the photos get a little spotty. I'll try to be as specifc as possible. Slide on the crank pulley onto the crankshaft. If you followed the steps up until now, the final friction washer should already be installed. One of the spokes on the crank pulley has a hole in it. Align that spoke so that it is pointing downward. Directly behind the crank pulley hole now should be a threaded hole for a 6mm (I think) bolt on the timing cover. Grab a 6mm bolt and pass it through the crank pulley hole and thread it into the timing cover. No need to torque the bolt too tight; you might end up snapping it. All you need it for is to hold the crank pulley in position for the next few steps. Thread in the crank pulley bolt by hand until it stops. *Ignore the fact that the picture has the oil pan and valvecover mounted. We're not there yet.* 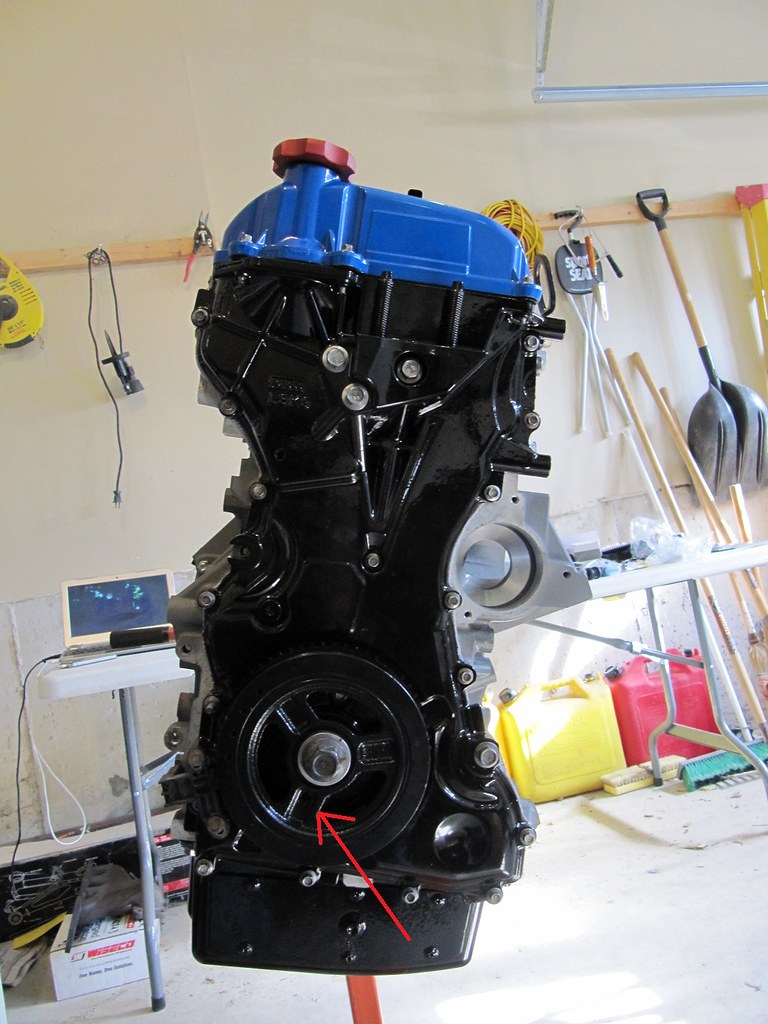 This part is very important now. Go back and make sure that a) the cam SST is still in place b) the front cam lobes are properly aligned (the first sets of lobes on each cam point upward and toward each other) and c) cylinder 1 is still at TDC. Note: You may want to swap out the TDC pin in the side of the block with a beefier M10 bolt or install the flywheel and jam it. There is a chance that if you tighten the crank pulley bolt just using the TDC pin, you may break it causing the pistons to hit the valves. Once you have verified everything is in place, its time to torque the crank pulley bolt. Grab your torque wrench and set it to 90ft-lbs. Torque the crank pulley bolt until the torque wrench clicks. Next. With a permanent marker, scribe a straight line through the edge of the crank pulley bolt, crank pulley washer and crank pulley. *Go to the kitchen, eat your wheaties and a shit ton of Popeye's spinach* Grab a biiiigggg effing breaker bar with a pipe extension and tighten the pulley bolt an additional 90 degrees (if you don't at least have a breaker bar for this step, go buy one). Use the markings on the crank pulley bolt and crank pulley to indicate where you are at. Once the marking on the crank pulley bolt is 90 degrees relative to the crank pulley, you're done. *Ignore the fact that the picture has the oil pan and valvecover mounted. We're not there yet.*  Now, its time to tighten the exhaust cam sprocket onto the cam. Grab your adjustable or open end wrench and position it on the hex portion of the cam (just behind cylinder 1). Grab another wrench and position it on the sprocket bolt. Holding the wrench on the hex portion of the cam steady, tighten the bolt to 50ft-lbs (I went by feel here). The trick is to not let the cam rotate at all when tightening (there's a bit of play in the SST) and let the bolt wrench do all the work. 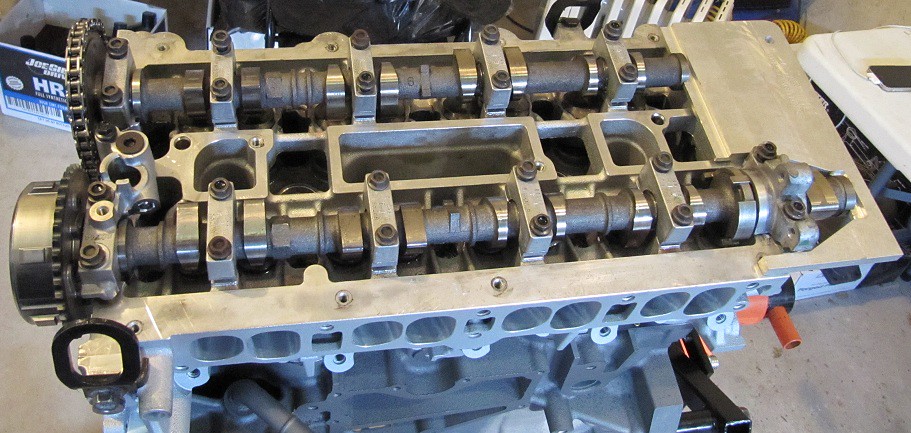 Go back and remove the bolt that secures the crank pulley to the timing cover, the TDC pin and the cam SST. For shits, giggles and awesomeness. Throw a ratchet onto the crank pulley bolt and spin the entire assembly. If you don't have spark plugs in the head, it should be pretty easy to rotate. Flip the block upside down in preparation for the oil pan installation. Part of the timing cover hangs below the short block. If you recall, we spread a bead of Permatex sealant around the entire perimeter earlier. Well, some of that Permatex never made contact with anything and has probably dried up by now. Wipe the excess off. 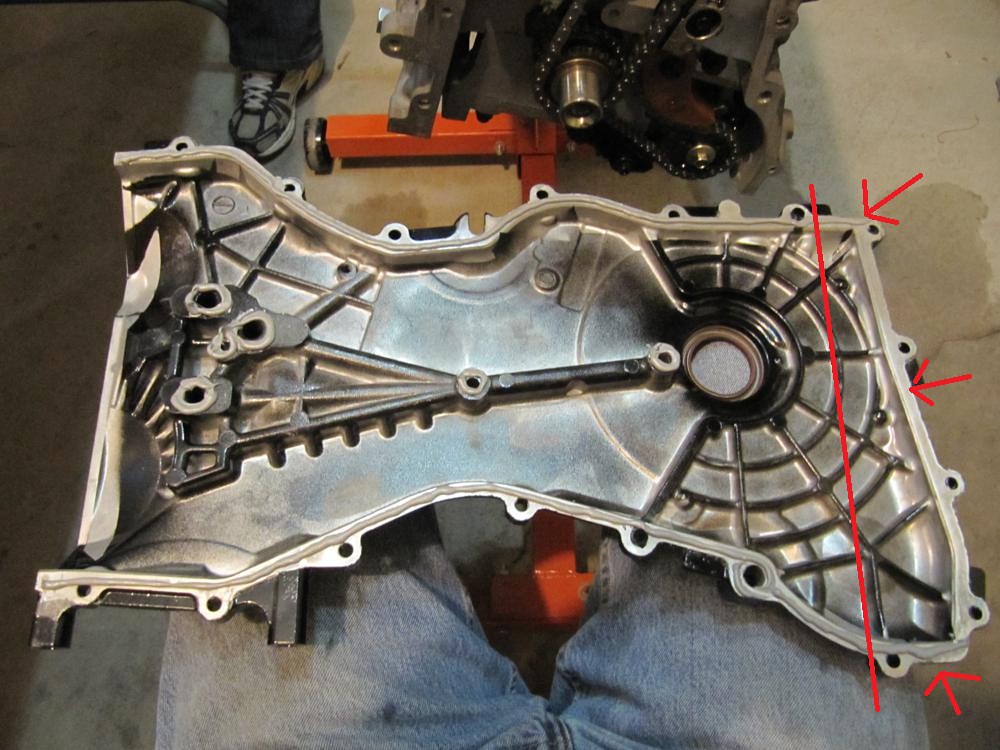 Spread a bead of Permatex sealant around the perimeter of the oil pan. Don't forget to put a bead on the portion where the oil pan meets the back of the timing cover. Lower the oil pan onto the block and install all the bolts. Make sure your drain plug is on as well (no picture unfortunately). Flip the block right-side up and install the valvecover. Your engine should now look something like this. 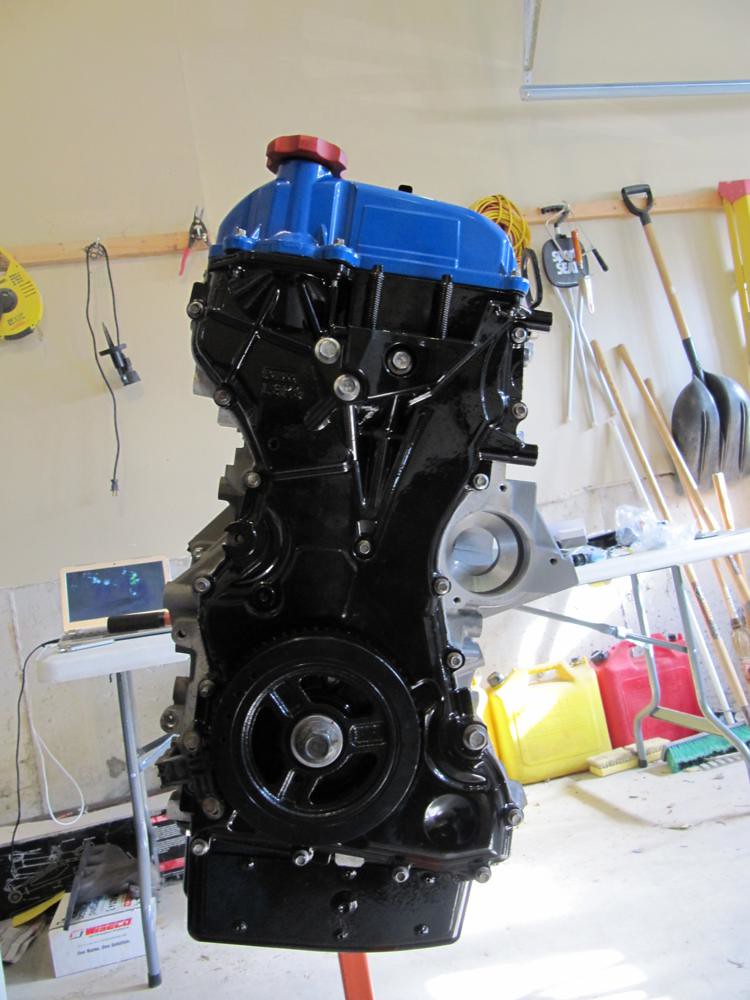  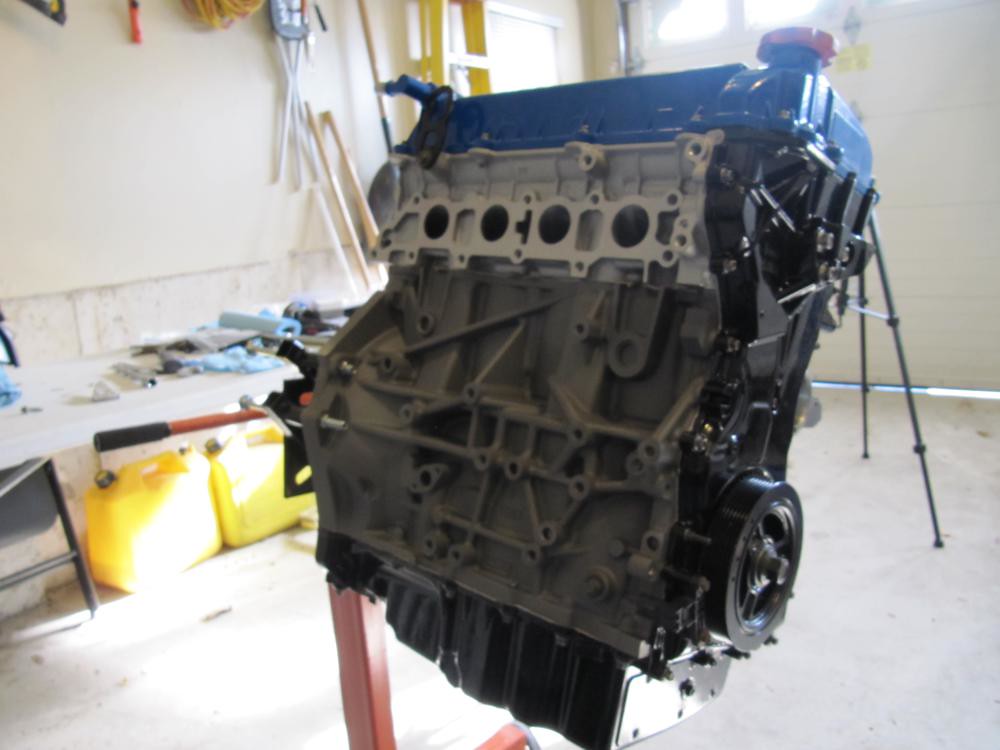 If it looks like a barn, you did it wrong (Simpsons, anyone?). Get the engine assembly on a hoist for the final piece; the rear main seal. I spread a bead of Permatex in the following manner; the Mazda manual omits the bottom portion. There was nothing to lose which was why I did it the way I did. *NOTE: The bead of Permatex was spread on the INSIDE of the rear main seal. I do not have the proper photo* 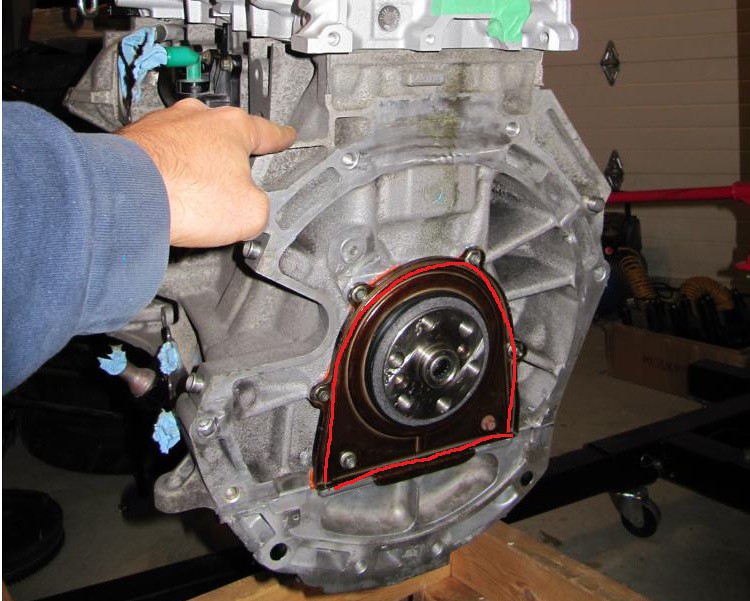 Install the rear main seal using the supplied install tool. All you need to do is position the seal onto the block, tighten the 6 bolts then remove the install tool (you'll know exactly what I mean when you see it).  DONE! Throw on more parts and it'll really start to look sexy.  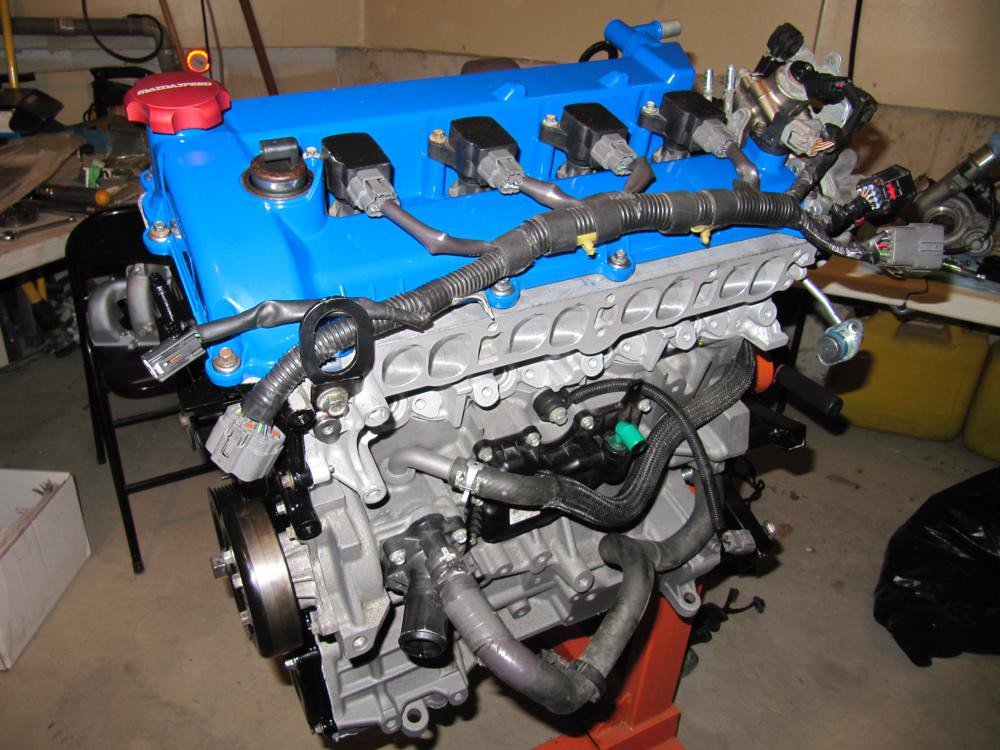 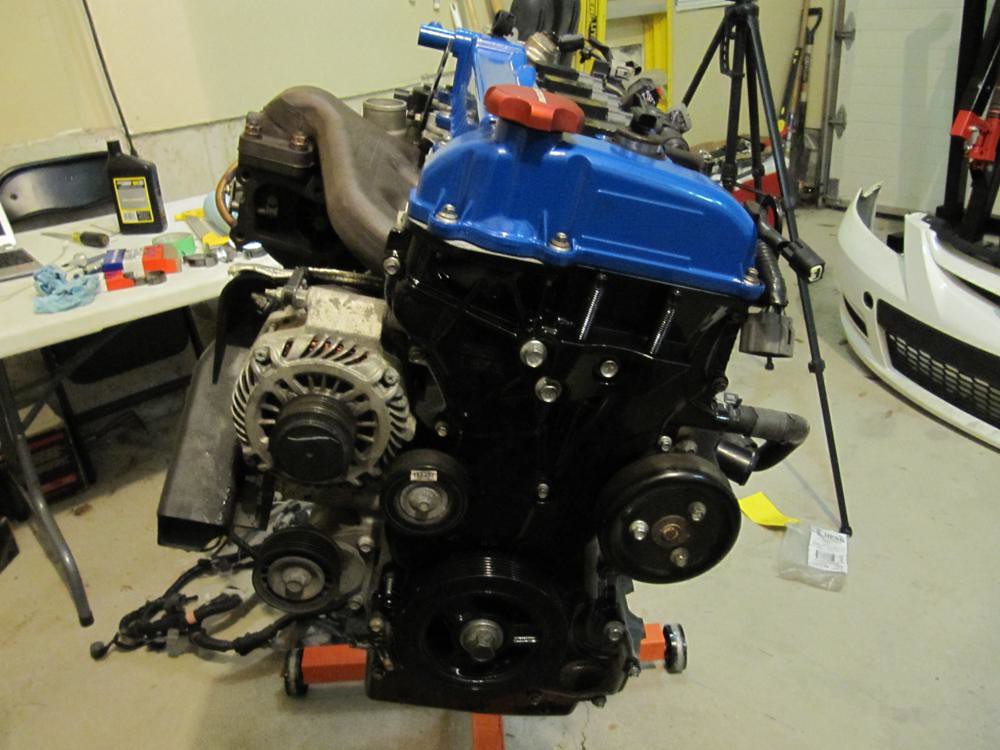   If I missed anything, let me know. Cheers
__________________ '07 CWP MS3 Forged. Last edited by BlueStreak; 01-19-2012 at 09:35 AM. |
|
| |
| The Following 50 Users Say Thank You to BlueStreak For This Useful Post: | 86AmishMs3 (05-12-2012), altaprecision (03-25-2015), Arnie1229 (01-13-2015), BackRoads (12-20-2013), BobtailedSnail (06-06-2013), breakfstincluded (09-24-2013), Broxer (04-16-2012), ButtholeRedMS3 (09-03-2015), chaser27 (10-03-2014), Dahouse702 (06-02-2013), dougefresh_ (01-18-2012), Fail_6 (02-04-2012), Fobio (02-04-2012), Funkster777 (04-14-2013), goHAMM (07-07-2014), GrumpyMPS (02-02-2015), Haltech (08-19-2012), HawkeyeGeoff (01-08-2016), helmetface (02-04-2012), JacksonMS30 (01-18-2012), magicka (04-15-2012), MATT DAMOND (01-18-2012), mazdafreak (06-24-2012), MD1032 (08-30-2017), Micha (10-11-2014), Miltron (09-30-2014), Mnassie (02-22-2019), mr.speedy3 (04-01-2014), MS3-a(sore)ASS-rex (01-20-2012), ms3blackmica (02-24-2013), navyspeed3 (04-03-2013), Novej (01-25-2012), p057 (08-19-2012), prosper0 (01-15-2016), RiceBurn2.3T (09-17-2012), Scribbles (02-04-2012), spals (10-27-2014), speedcig (06-18-2013), Squid (02-24-2012), super_pablo_ (12-19-2012), TexasSpeed3 (04-08-2012), theschrum (03-17-2012), TiGraySpeed6 (01-18-2012), Tomas (02-03-2012), torquemaniac (11-19-2013), trf5000 (01-18-2012), VulgarKyle (07-09-2013), WetzMS3 (10-10-2014), zatara (01-18-2012), zer010gic (02-21-2015) |
|
01-16-2012, 12:03 PM
| #5 | |
  Join Date: Jun 2009 Location: Denver Colorado
Posts: 2,242
(View Stats)
iTrader: (8)
Rep Power: 2697 Thanks: 9,601
Thanked 5,080 Times in 1,373 Posts
Groans: 0
Groaned at 4 Times in 4 Posts
| Not Ranked : 0 score Thank you, you have given me courage to attempt this on my own when the time comes  Though I'll probably hate myself for it later...  edit: I can delete this post if it is in your way... RiceBurn2.3T likes this.
__________________ 2008 MGM MS3 GT - HTA3586- - P.E.R.M Twisted Top Mount - - P.E.R.M. Fifth/Sixth Port Injection - - P.E.R.M.  Tuning - Tuning - |
|
| |
| The Following User Says Thank You to JacksonMS30 For This Useful Post: | BlueStreak (01-16-2012) |
|
01-16-2012, 12:08 PM
| #6 | |
| Join Date: Sep 2008 Location: Toronto, Ontario, Canada
Posts: 1,467
(View Stats)
iTrader: (1)
Rep Power: 2202 Thanks: 4,767
Thanked 4,088 Times in 1,066 Posts
Groans: 2
Groaned at 2 Times in 2 Posts
(Thread Starter) | Not Ranked : 0 score

__________________ '07 CWP MS3 Forged. | |
|
| |
| The Following User Says Thank You to BlueStreak For This Useful Post: | JacksonMS30 (01-16-2012) |
|
01-16-2012, 12:11 PM
| #7 | |
  Join Date: Jul 2011 Location: Cleveland
Posts: 157
(View Stats)
iTrader: (0)
Rep Power: 0 Thanks: 10,451
Thanked 493 Times in 74 Posts
Groans: 17
Groaned at 6 Times in 5 Posts
| Not Ranked : 0 score Loving it so far! I won't be doing this extremely soon, but when the time comes, looks like I've got a guide to use. Thank you!
__________________ COBB AP // JBR SSP // Sure AERO SRI // CPE RMM 75 Duro // O.Z. Racing Wheels // Test Pipe// Autotech Internals // Forge V.1 BPV // |
|
| |
| The Following User Says Thank You to SweetJP For This Useful Post: | BlueStreak (01-16-2012) |
|
01-16-2012, 12:34 PM
| #8 | |
 Join Date: Mar 2010 Location: Lewistown, PA (State College)
Posts: 2,290
(View Stats)
iTrader: (4)
Rep Power: 1938 Thanks: 3,144
Thanked 3,578 Times in 1,432 Posts
Groans: 16
Groaned at 10 Times in 10 Posts
| Not Ranked : 0 score This is fucking awesome.
__________________ 2010 MS3 - Sold 2015 CX-5 GT AWD - Current  |
|
| |
| The Following 2 Users Say Thank You to trf5000 For This Useful Post: | BlueStreak (01-16-2012), fz6brian (11-05-2014) |
|
01-16-2012, 12:39 PM
| #9 | |
 Join Date: Sep 2011 Location: Lexington Park, MD
Posts: 1,238
(View Stats)
iTrader: (3)
Rep Power: 0 Thanks: 6,852
Thanked 1,059 Times in 521 Posts
Groans: 165
Groaned at 7 Times in 7 Posts
| Not Ranked : 0 score You make it seem so easy.
__________________ New....Camaro SS/RS Stocked out  selling parts. selling parts.2011 Black MS3 -GTX3071R , 38mm Tial Wastegate, CPE Exhaust Manifold, Cobb AP, HKS SSQV 4, Autotech Internals, JBR SSP & Bushings, JBR Fully mounted 88 duro, JBR OCC, JBR EGR delete, TWM M1Knob, H&R springs, Ultimate Racing Turbo back, NKG plugs, CP-E FMIC, big MAF, big TIP, Grimmspeed MBC, SPC Rear Camber Arms, JBR Sway bar. 2006 Jeep Wrangler -20 grand of Shit |
|
| |
| The Following 2 Users Say Thank You to uncorked11 For This Useful Post: | BlueStreak (01-16-2012), SLOWHATCH (01-17-2012) |
|
01-16-2012, 12:44 PM
| #10 | |
| Will fuck up ur day   Join Date: Feb 2010 Location: Parrish, FL
Posts: 6,003
(View Stats)
iTrader: (1)
Rep Power: 4200 Thanks: 5,803
Thanked 8,046 Times in 3,143 Posts
Groans: 433
Groaned at 224 Times in 138 Posts
| Not Ranked : 0 score Very nice. Stuck.
__________________ 07 MS3 The original Genpoo Hater PTE 5862cea ball bearing, plus some built stuff. Turismo Vids - Store your car vids and pics here! Blog your builds too! Click here for great deals at The RPM Store! PM me for pricing! I hear that honkey at Protégé Garage is pretty decent too. |
|
| |
| The Following User Says Thank You to Chimmike For This Useful Post: | BlueStreak (01-16-2012) |
|
01-16-2012, 12:51 PM
| #11 | |
 Join Date: Jul 2009 Location: South Florida
Posts: 4,489
(View Stats)
iTrader: (1)
Rep Power: 0 Thanks: 9,578
Thanked 6,365 Times in 2,335 Posts
Groans: 25
Groaned at 23 Times in 22 Posts
| Not Ranked : 0 score Excellent write up. Thanks so much for this! Looking forward to the rest
__________________ 2012 BMW 535i Alpine White/Beige (30K miles) N55 Dinan Stage 1 w/ Intake. Tech package w/ Bluetooth audio/streaming, SAT Radio, & 12.5G HD, Navi Sys Pro w/ Back-up Cam/sensors & Park Distant Control; Auto-Trunk, TPC, LED lighting interior (doors) and exterior (door handles), & tint. [SIGPIC][/SIGPIC] |
|
| |
| The Following User Says Thank You to dougefresh_ For This Useful Post: | BlueStreak (01-16-2012) |
|
01-16-2012, 07:56 PM
| #12 | |
 Join Date: Jun 2009 Location: Tally, FL
Posts: 3,981
(View Stats)
iTrader: (1)
Rep Power: 3058 Thanks: 4,683
Thanked 5,754 Times in 2,278 Posts
Groans: 2
Groaned at 3 Times in 3 Posts
| Not Ranked : 0 score Like a fucking BOSS. Thanks for the great write up, this is gonna be great to follow
__________________ Was a Mazdaspeed6 GT #3476 TiGray slicktop Now in a BMW 135i - double the turbos, double the fun! E82.N54 2009 / BSM / A/T / Drop-in / PR CP / Berk Street / MHD / xHP 340hp / 371tq |
|
| |
| The Following User Says Thank You to TiGraySpeed6 For This Useful Post: | BlueStreak (01-16-2012) |
|
01-16-2012, 08:14 PM
| #13 | |
| rabble rabble  Join Date: Aug 2008 Location: Delawhere
Posts: 5,318
(View Stats)
iTrader: (1)
Rep Power: 3167 Thanks: 9,400
Thanked 5,935 Times in 2,083 Posts
Groans: 221
Groaned at 103 Times in 56 Posts
| Not Ranked : 0 score go canada!
__________________ '08 CWP MS3 w/ T3 3071r |
|
| |
| The Following 3 Users Say Thank You to 802MS3 For This Useful Post: |
|
01-16-2012, 09:25 PM
| #14 | |
 Join Date: Jun 2010 Location: corpus christ, tx
Posts: 1,093
(View Stats)
iTrader: (4)
Rep Power: 0 Thanks: 1,316
Thanked 1,564 Times in 638 Posts
Groans: 68
Groaned at 22 Times in 9 Posts
| Not Ranked : 0 score My favorite how to so far!
__________________ 2006 MS6 -GTX3076 .82 AR-Steedspeed Topmount mani-DJ/PERM Top mount Kit with PERM tune-CXracing FMIC-Tial .44mm WG - KMD Internals- Sure RDM, Turbine tech FDM and FMM=JBR trilogy MM- Whiteline rear sway- eibach prosport springs-jbarone SSP-COBB AP-ACT 6PUCK- ITV22-Prosport Spin On Conversion-Snow Performance stg 2 Meth-CPE Injector seals-Matt Damon OCC |
|
| |
| The Following 2 Users Say Thank You to crazyp For This Useful Post: | BlueStreak (01-17-2012), SLOWHATCH (01-17-2012) |
|
01-17-2012, 12:15 AM
| #15 | |
 Join Date: May 2011 Location: Las Vegas NV
Posts: 487
(View Stats)
iTrader: (1)
Rep Power: 0 Thanks: 655
Thanked 225 Times in 126 Posts
Groans: 12
Groaned at 5 Times in 4 Posts
| Not Ranked : 0 score Thanks for the write up! You make it seem so damn easy!
__________________ 2007 MS3 Black Mica-Totaled @98500 on 09/2014 Current Car... 2009 MS3 Black Mica GT JBR TRU 3.0 Widepath full intake, BNR S3 v1, GS EBCS, 3 BAR , Forge BPV V2, Autotech internals , Denso Itv22, CNT Downpipe, CX-Racing piping with Cobb v2 core, Cobb AP v2, JBR RMM, JBR PMM, JBR TMM, JBR Oil Catch Can, EGR Delete, JBR TIG, Toyota Seals, HTP battery tray, DashHAWK Zoom Zoom |
|
| |
| The Following User Says Thank You to Dahouse702 For This Useful Post: | BlueStreak (01-17-2012) |
|
01-17-2012, 11:44 AM
| #16 | |
| Join Date: Sep 2008 Location: Toronto, Ontario, Canada
Posts: 1,467
(View Stats)
iTrader: (1)
Rep Power: 2202 Thanks: 4,767
Thanked 4,088 Times in 1,066 Posts
Groans: 2
Groaned at 2 Times in 2 Posts
(Thread Starter) | Not Ranked : 0 score More info added. Almost done.
__________________ '07 CWP MS3 Forged. |
|
| |
| The Following 2 Users Say Thank You to BlueStreak For This Useful Post: | dougefresh_ (01-17-2012), TiGraySpeed6 (01-17-2012) |
|
01-17-2012, 12:15 PM
| #17 | |
 Join Date: Sep 2009 Location: East Brunswick NJ
Posts: 1,721
(View Stats)
iTrader: (5)
Rep Power: 0 Thanks: 19,573
Thanked 1,489 Times in 642 Posts
Groans: 44
Groaned at 20 Times in 18 Posts
| Not Ranked : 0 score this will be a big help when i build my engine someday when i get money
__________________ 2010 Black Mica Speed3 SOLD 2005 Jeep Wrangler X Impact OrangeSOLD 2015 Subaru XV Crosstrek Tangerine Orange Pearl |
|
| |
| The Following User Says Thank You to fishin53 For This Useful Post: | BlueStreak (01-17-2012) |
|
01-17-2012, 12:32 PM
| #18 | |
| Join Date: Jun 2009 Location: Tally, FL
Posts: 3,981
(View Stats)
iTrader: (1)
Rep Power: 3058 Thanks: 4,683
Thanked 5,754 Times in 2,278 Posts
Groans: 2
Groaned at 3 Times in 3 Posts
| Not Ranked : 0 score You can tell it's a great how-to cause you're making it look easy & the steps seem so obvious that it's just sort of a "Well, duh, how else could it possibly be". Making a complex process easy to digest. Again, like a fucking BOSS! It's reading things like this:
__________________ Was a Mazdaspeed6 GT #3476 TiGray slicktop Now in a BMW 135i - double the turbos, double the fun! E82.N54 2009 / BSM / A/T / Drop-in / PR CP / Berk Street / MHD / xHP 340hp / 371tq | |
|
| |
| The Following 3 Users Say Thank You to TiGraySpeed6 For This Useful Post: |
|
01-17-2012, 12:37 PM
| #19 | |
| Join Date: Sep 2008 Location: Toronto, Ontario, Canada
Posts: 1,467
(View Stats)
iTrader: (1)
Rep Power: 2202 Thanks: 4,767
Thanked 4,088 Times in 1,066 Posts
Groans: 2
Groaned at 2 Times in 2 Posts
(Thread Starter) | Not Ranked : 0 score
__________________ '07 CWP MS3 Forged. | |
|
| |
| The Following 3 Users Say Thank You to BlueStreak For This Useful Post: |
|
01-17-2012, 12:56 PM
| #20 | |
| Trail of Fail  Join Date: Jan 2010 Location: rock city AR
Posts: 9,484
(View Stats)
iTrader: (2)
Rep Power: 9906 Thanks: 10,493
Thanked 19,250 Times in 6,532 Posts
Groans: 37
Groaned at 25 Times in 22 Posts
| Not Ranked : 0 score Awesome writeup w great pics man! Tappin
__________________  07 Red MS3 GT - E40 - Carrillo Rods - Wiseco Pistons - BSD - JBR 3.5 WidePath - ATP GTX3071 - Forge BPV - GA - Cobb v2 FMIC - CPE EM - CPE DP - CNT CBE - APv3 - Grim EBC - PERM dual port PCV plate - Dano dual OCC - CPE CDFP - Labonte S2 WMI - ACT Street Kit - SUv2 RMM - SU TM - "Stiffy" MM - DG CF wing ext, skirts & front lip - Hotchkis RSB/FSB w PowerGrid Links - Koni FSDs - DBA SX4000 Rotors - Hawk Pads - Silver OZ Ultraleggera - 235/40/18 NT-01 |
|
| |
| The Following User Says Thank You to Dano For This Useful Post: | BlueStreak (01-17-2012) |
|
01-17-2012, 01:35 PM
| #21 | |
 Join Date: Oct 2009 Location: Houston, TX
Posts: 1,199
(View Stats)
iTrader: (3)
Rep Power: 0 Thanks: 2,684
Thanked 2,328 Times in 676 Posts
Groans: 12
Groaned at 22 Times in 14 Posts
| Not Ranked : 0 score Epic how-to is epic! I agree with others, you make it look easy. You kind of lost me on the "cam alignment" part, but I'll have to re-read it a few times for it to sink in.
__________________ ● 2011 Jaguar XFR ● Full Resonator Delete ● Mina Cat-Back Exhaust ● Staggered Giovanna Portofinos ● ● 2010 Mazdaspeed 3 - GONE ● |
|
| |
| The Following User Says Thank You to alien_sporez For This Useful Post: | BlueStreak (01-17-2012) |
|
01-17-2012, 01:50 PM
| #22 | |
 Join Date: Nov 2010 Location: Lake Carmel, NY
Posts: 1,505
(View Stats)
iTrader: (4)
Rep Power: 0 Thanks: 773
Thanked 2,283 Times in 817 Posts
Groans: 1
Groaned at 5 Times in 5 Posts
| Not Ranked : 0 score This should have a NSFW tag, because all that engine porn is making me steamy. Excellent write-up.
__________________ 2010 Mazdaspeed 3 Black Mica CorkSport SRI/ TIP-- CorkSport TMIC-- Cobb DP-- CorkSport CBE-- Cobb AP Stratified Lex Tune-- Autotech Internals-- Denso ITV22's-- JBR EGR Blockoff-- JBR OCC-- JBR 88 Chrome-Molly RMM-- JBR 80 PMM-- JBR 88 TMM-- Corksport Skidplate-- JBR RSB Red JBR shift knob-- VG Sharkfin--CS LED interior lights-- Hardwired Valentine 1 Radar detector-- 5K HID lows-- 3K HID Fogs-- 30% tint front, 20% tint rear |
|
| |
| The Following 2 Users Say Thank You to zatara For This Useful Post: | BlueStreak (01-17-2012), Micha (12-07-2014) |
|
01-17-2012, 04:24 PM
| #23 | |
 Join Date: Jan 2010 Location: charles co, MD
Posts: 2,423
(View Stats)
iTrader: (4)
Rep Power: 0 Thanks: 1,295
Thanked 2,495 Times in 989 Posts
Groans: 8
Groaned at 8 Times in 6 Posts
| Not Ranked : 0 score Just make sure that you install the pistons in with the valve cut outs on the front of the engine. If you install them with them in the rear your intake valves may hit..
__________________ Best time is 12.28@112 with a 1.68 60ft "GONE HUNTING BE BACK IN 11 SECS" 365HP and 333 TQ AT 20Psi gt3076 7 blade track weight 3220 street weight 3370 fully built motor//carrilo rods//cp pistons//ACT 6 puck//all mounts//gt3582 turbo//CPE manifold//ported intake//h&r coils//brembo brakes//tr10 I/C//accessport |
|
| |
| The Following User Says Thank You to qtrmile beast For This Useful Post: | BlueStreak (01-17-2012) |
|
01-18-2012, 06:51 AM
| #24 | |
| Join Date: Jun 2009 Location: Denver Colorado
Posts: 2,242
(View Stats)
iTrader: (8)
Rep Power: 2697 Thanks: 9,601
Thanked 5,080 Times in 1,373 Posts
Groans: 0
Groaned at 4 Times in 4 Posts
| Not Ranked : 0 score Went ahead and thanked your last reserved post in anticipation  For those that would be torquing there head studs to 80/90 ftlbs, would you make a 4th pass to do that or do you still only want to do three passes with the torque wrench? Where did you get your block?
__________________ 2008 MGM MS3 GT - HTA3586- - P.E.R.M Twisted Top Mount - - P.E.R.M. Fifth/Sixth Port Injection - - P.E.R.M. Tuning -Last edited by JacksonMS30; 01-18-2012 at 09:36 AM. |
|
| |
| The Following User Says Thank You to JacksonMS30 For This Useful Post: | BlueStreak (01-18-2012) |
|
01-18-2012, 09:53 AM
| #25 | |
| Join Date: Sep 2008 Location: Toronto, Ontario, Canada
Posts: 1,467
(View Stats)
iTrader: (1)
Rep Power: 2202 Thanks: 4,767
Thanked 4,088 Times in 1,066 Posts
Groans: 2
Groaned at 2 Times in 2 Posts
(Thread Starter) | Not Ranked : 0 score
If I were to torque the head down to higher values, I'd just add an extra pass (in 20ft-lbs increments) until I reached what I wanted. The purpose of the multiple passes is to inch it down towards the block nice and true. I got the block off a friend. He stripped his car and will be sourcing an LS motor sometime in the next year.
__________________ '07 CWP MS3 Forged. | |
|
| |
| The Following User Says Thank You to BlueStreak For This Useful Post: | JacksonMS30 (01-18-2012) |
|
01-18-2012, 11:18 AM
| #26 | |
| Join Date: Sep 2008 Location: Toronto, Ontario, Canada
Posts: 1,467
(View Stats)
iTrader: (1)
Rep Power: 2202 Thanks: 4,767
Thanked 4,088 Times in 1,066 Posts
Groans: 2
Groaned at 2 Times in 2 Posts
(Thread Starter) | Not Ranked : 0 score Write up is complete. Enjoy. Micha likes this.
__________________ '07 CWP MS3 Forged. |
|
| |
| The Following 7 Users Say Thank You to BlueStreak For This Useful Post: | BackRoads (12-20-2013), Bob-o (10-13-2013), dougefresh_ (01-18-2012), Micha (10-11-2014), Mnassie (02-22-2019), TiGraySpeed6 (01-18-2012), Zabbin123 (12-11-2012) |
|
01-18-2012, 01:24 PM
| #27 | |
| I have candy in my van  Join Date: Apr 2009 Location: Chicago, IL
Posts: 1,931
(View Stats)
iTrader: (18)
Rep Power: 2810 Thanks: 4,091
Thanked 5,279 Times in 1,154 Posts
Groans: 70
Groaned at 17 Times in 14 Posts
| Not Ranked : 0 score Awesome how-to. I was planning on doing this how-to for my MS5 build. I'm so glad I don't have to do it now. lol
__________________ Current Fail: 2008 Mazda5 DD/Mazdaspeed5 BT project  |
|
| |
| The Following User Says Thank You to MATT DAMOND For This Useful Post: | BlueStreak (01-18-2012) |
|
01-18-2012, 02:51 PM
| #28 | |
 Join Date: Nov 2010 Location: Moorefield, West Virginia
Posts: 198
(View Stats)
iTrader: (0)
Rep Power: 138 Thanks: 8
Thanked 51 Times in 35 Posts
Groans: 13
Groaned at 48 Times in 7 Posts
| Not Ranked : 0 score Really nice write up. Thanks for the time and effort.
__________________  '06 MS6 GT '06 MS6 GTWild Wonderful, West Virginia Cobb AP, Magnaflow Catback, Underbody Cat Delete, ETS TMIC, Corksport SRI & TIP, Spyder LED Tail Lights, HKS BPV, Drilled & Slotted Rotors front and rear w/Ferro Carbon pads, 35% Tinted Glass |
|
| |
| The Following User Says Thank You to Noddaford For This Useful Post: | BlueStreak (01-18-2012) |
|
02-03-2012, 06:15 PM
| #29 | |
 Join Date: Oct 2009
Posts: 103
(View Stats)
iTrader: (1)
Rep Power: 0 Thanks: 1
Thanked 18 Times in 13 Posts
Groans: 0
Groaned at 1 Time in 1 Post
| Not Ranked : 0 score Great write up! Do you by chance remember what size the stock head bolts were? Can't find the proper socket to remove the stock 12pt head bolts. |
|
| |
| The Following User Says Thank You to cplensdorf For This Useful Post: | BlueStreak (02-04-2012) |
|
02-03-2012, 08:42 PM
| #30 | |
| Join Date: Jan 2010 Location: charles co, MD
Posts: 2,423
(View Stats)
iTrader: (4)
Rep Power: 0 Thanks: 1,295
Thanked 2,495 Times in 989 Posts
Groans: 8
Groaned at 8 Times in 6 Posts
| Not Ranked : 0 score
lol you use a 12 point socket... the 6 point will not fit...
__________________ Best time is 12.28@112 with a 1.68 60ft "GONE HUNTING BE BACK IN 11 SECS" 365HP and 333 TQ AT 20Psi gt3076 7 blade track weight 3220 street weight 3370 fully built motor//carrilo rods//cp pistons//ACT 6 puck//all mounts//gt3582 turbo//CPE manifold//ported intake//h&r coils//brembo brakes//tr10 I/C//accessport Last edited by qtrmile beast; 02-04-2012 at 06:55 AM. | |
|
| |
| The Following User Says Thank You to qtrmile beast For This Useful Post: | BlueStreak (02-04-2012) |
|
02-04-2012, 06:30 AM
| #31 | |
| Join Date: Sep 2008 Location: Toronto, Ontario, Canada
Posts: 1,467
(View Stats)
iTrader: (1)
Rep Power: 2202 Thanks: 4,767
Thanked 4,088 Times in 1,066 Posts
Groans: 2
Groaned at 2 Times in 2 Posts
(Thread Starter) | Not Ranked : 0 score I think it was a 12mm 12 point. Can't remember 100%. Valve clearance is adjusted by swapping in buckets with different thicknesses that will take up the slack between the top of the valve stem and the cam lobe. They are numbered on the inside and Mazda offers around 20 different bucket measurements in very small increments. I don't know what measurement is ideal. I can go back and ask the engine builder what mine were set at if you'd like. They document everything. Sent from my iPhone using Tapatalk
__________________ '07 CWP MS3 Forged. |
|
| |
| The Following User Says Thank You to BlueStreak For This Useful Post: | Tomas (02-04-2012) |
|
02-04-2012, 06:37 AM
| #32 | |
| Bob Ross Fanclub Join Date: Jan 2009 Location: SEFL
Posts: 3,811
(View Stats)
iTrader: (8)
Rep Power: 4333 Thanks: 4,534
Thanked 8,223 Times in 2,349 Posts
Groans: 0
Groaned at 35 Times in 20 Posts
| Not Ranked : 0 score Aha! Holly shit. I am glad I read this thread. Found the specs in the manual. 0.22mm to 0.28mm intake 0.27mm to 0.33mm exhaust 2012-02-04_0836.png
__________________ |
|
| |
| The Following User Says Thank You to Tomas For This Useful Post: | BlueStreak (02-04-2012) |
|
02-04-2012, 06:54 AM
| #33 | |
| Join Date: Oct 2009
Posts: 103
(View Stats)
iTrader: (1)
Rep Power: 0 Thanks: 1
Thanked 18 Times in 13 Posts
Groans: 0
Groaned at 1 Time in 1 Post
| Not Ranked : 0 score Everyone keeps saying 12mm 12pt but that just spins...this is frustrating...tried multiple sockets including brand new one.... |
|
| |
|
02-04-2012, 06:59 AM
| #34 | |
| Join Date: Jan 2010 Location: charles co, MD
Posts: 2,423
(View Stats)
iTrader: (4)
Rep Power: 0 Thanks: 1,295
Thanked 2,495 Times in 989 Posts
Groans: 8
Groaned at 8 Times in 6 Posts
| Not Ranked : 0 score
Take a video of it but if it just spins then maybe it is either already loose or broken perhaps, hope it is not stripped? Is it all of them or just one that it is doing that with? have you tried the 11mm 12point or other sizes since it is spinning on the bolt?
__________________ Best time is 12.28@112 with a 1.68 60ft "GONE HUNTING BE BACK IN 11 SECS" 365HP and 333 TQ AT 20Psi gt3076 7 blade track weight 3220 street weight 3370 fully built motor//carrilo rods//cp pistons//ACT 6 puck//all mounts//gt3582 turbo//CPE manifold//ported intake//h&r coils//brembo brakes//tr10 I/C//accessport | |
|
| |
|
02-04-2012, 07:17 AM
| #35 | |
| Join Date: Jun 2009 Location: Tally, FL
Posts: 3,981
(View Stats)
iTrader: (1)
Rep Power: 3058 Thanks: 4,683
Thanked 5,754 Times in 2,278 Posts
Groans: 2
Groaned at 3 Times in 3 Posts
| Not Ranked : 0 score For those in need of a bit more clarity, like me, a picture I had thought it was a special socket for the head bolts, but nope, just actually using all the contact area of your average 12 pt socket. Nifty... 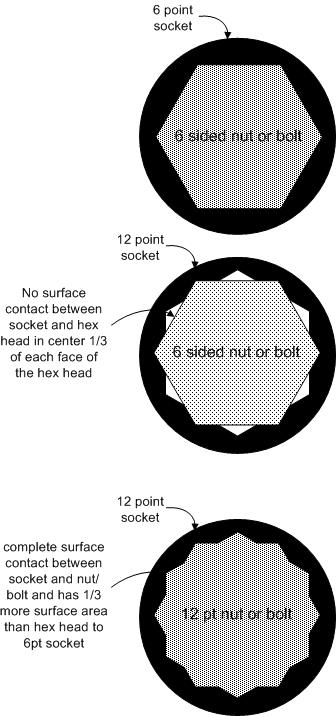
__________________ Was a Mazdaspeed6 GT #3476 TiGray slicktop Now in a BMW 135i - double the turbos, double the fun! E82.N54 2009 / BSM / A/T / Drop-in / PR CP / Berk Street / MHD / xHP 340hp / 371tq |
|
| |
|
02-04-2012, 09:06 AM
| #36 | |
| Join Date: Oct 2009
Posts: 103
(View Stats)
iTrader: (1)
Rep Power: 0 Thanks: 1
Thanked 18 Times in 13 Posts
Groans: 0
Groaned at 1 Time in 1 Post
| Not Ranked : 0 score Yep..tried 11pt and even standard. Too small or too big. bolts aren't stripped. It is all of them and none are broken or loose. Its baffling. |
|
| |
|
02-04-2012, 10:27 AM
| #37 | |
| Bob Ross Fanclub Join Date: Jan 2009 Location: SEFL
Posts: 3,811
(View Stats)
iTrader: (8)
Rep Power: 4333 Thanks: 4,534
Thanked 8,223 Times in 2,349 Posts
Groans: 0
Groaned at 35 Times in 20 Posts
| Not Ranked : 0 score By the way, Do you get any cold start piston slap at all with the wiseco pistons? If yes, for how long?
__________________ |
|
| |
|
02-04-2012, 11:28 AM
| #38 | |
 Join Date: Mar 2010 Location: Memphis, TN
Posts: 779
(View Stats)
iTrader: (1)
Rep Power: 315 Thanks: 621
Thanked 376 Times in 198 Posts
Groans: 20
Groaned at 24 Times in 5 Posts
| Not Ranked : 0 score any particular reason that you applied lube to both sides of the bearing. ive always left the "block" or "rod" side dry as to make sure there was no chance the bearing could spin Arnie1229 likes this.
__________________ 2007 Speed 6 Liquid Platinum Metallic, DIY Duplicolor Graphite Wheel Paint, Clutchmasters FX100, Stock again with 91 ots tune |
|
| |
| The Following User Says Thank You to laxplayermjd For This Useful Post: | Arnie1229 (01-13-2015) |
|
02-04-2012, 03:19 PM
| #39 | |
| Join Date: Sep 2008 Location: Toronto, Ontario, Canada
Posts: 1,467
(View Stats)
iTrader: (1)
Rep Power: 2202 Thanks: 4,767
Thanked 4,088 Times in 1,066 Posts
Groans: 2
Groaned at 2 Times in 2 Posts
(Thread Starter) | Not Ranked : 0 score
__________________ '07 CWP MS3 Forged. | ||
|
| |
| The Following User Says Thank You to BlueStreak For This Useful Post: | Tomas (02-04-2012) |
|
04-08-2012, 10:05 PM
| #40 | |
 Join Date: Aug 2008 Location: Kahaluu, HI
Posts: 180
(View Stats)
iTrader: (0)
Rep Power: 0 Thanks: 37
Thanked 40 Times in 26 Posts
Groans: 2
Groaned at 0 Times in 0 Posts
| Not Ranked : 0 score flywheel and clutch assembly and this how to would be epic.
__________________ 07 Black Mica with Sunroof" 11/17/11 ZZ-SB (Spun #4 Rod Bearing @97,643 miles) "I'm back Baby" says the almighty Bender CURRENT MODS: Cobb ATR self tune+JBR WP+FMIC+BNR S3+MI+IM+CP-e EXMAN: VDyno 351hp and 331tq BEST 1320: COBB AP S2+MSCAI2+FMIC-v1.03i Best ET on 2Nov08 13.6@98mph (yeah I missed 5th gear) |
|
| |
|
 LinkBacks (?)
LinkBack to this Thread: http://www.mazdaspeedforum.org/forum/forum/f33/how-assemble-forged-motor-102388/ | ||||
| Posted By | For | Type | Date | |
| 2007 mazda cx-7 timing chain marks | This thread | Refback | 11-22-2015 07:01 PM | |
| Tech / Motor build how too | This thread | Refback | 05-08-2012 07:34 PM | |
| Currently Active Users Viewing This Thread: 1 (0 members and 1 guests) | |
| |
|
Similar Threads | ||||
| Thread | Thread Starter | Forum | Replies | Last Post |
| Forged pistons and building the motor | Lex | MazdaSpeed 3 - Engine, Transmission & Driveline | 45 | 06-11-2012 12:11 AM |
| Coaststarlight's Forged Motor Build Thread! | Coaststarlight | MazdaSpeed 6 - Engine, Transmission & Driveline | 37 | 02-09-2011 02:30 PM |
| How many Miles on your Forged/Built Motor | Coaststarlight | MazdaSpeed 6 - Engine, Transmission & Driveline | 0 | 11-07-2010 08:02 PM |
| Big Bore Forged Motor Thread! | ptperformance | Mazdaspeed3/6 General Discussion | 30 | 06-19-2010 02:39 PM |
| Powder forged rods versus drop forged. | Lex | MazdaSpeed 3 - Engine, Transmission & Driveline | 1 | 01-24-2009 06:27 AM |


 26Likes


 Hybrid Mode


